
Table of Contents
-
- Introduction
- Percolation and Immersion
- Why use a V60 ?
- The Brew Variables
- Coffee to Water Ratio
- Coffee Beans Quality and Roast Profile
- Grind Size and Uniformity
- Coffee Freshness
- Filter quality
- Brew temperature
- Water Agitation
- Uniformity of Extraction and Repeatability
- Water quality
- Contact Time
- Determining Grind Size
- Practicing the Rao Spin
- How To Actually Make a Better V60
- The Gear I Use
- The Water I Recommend
- A V60 Pour Over Workflow
- References
1. Introduction
I’ve been interested in specialty coffee for a few years now, and never went to a telescope run without my V60, manual grinder and some fresh beans. I had not actually read that much about the details of how to brew a great cup of coffee; rather, I just bought some good beans and read some reviews for the most useful and easily transportable gear to brew coffee when traveling. A few months ago, I decided to get a little deeper into this, and to read as much as I could on the subject. This all started because I was regularly buying fresh, great tasting beans from the Saint-Henri coffee shop in Montreal, and I really wasn’t satisfied about my brews, especially when I compared them with what the Saint-Henri staff brewed with the same coffee.
This turned out to be a massive rabbit hole, but I actually love it when it happens. During the past few months, I changed a lot of things about my brew method and equipment. Having great coffee beans is definitely required to brew a great coffee, but I learned there are countless obstacles that can ruin your cup pretty drastically, regardless of your bean’s quality. I was quite surprised how hard some of this information was to find on the web, and in the past months I have done a lot of experiments and huge mistakes that took me a while to figure out. So, I decided that I’ll write a blog post to distill some of this information, and to guide any interested readers through the steps to improve their coffee cups, either at home or when traveling. I might write a few more posts like this in the future when I discover better methods, or when I familiarize myself with new tools and recipes.
Another thing that really frustrated me when researching this topic is the amount of pseudoscience one encounters on the subject of specialty coffee. Surprisingly enough, some of the main culprits include previous world champion baristas (hmmmmmm Kasuya, are you using these magical self-transmuting beans again ?)
For those who don’t know me, this blog post is not intended to be a quick-and-approximate guide of how to make a V60 – there are plenty of videos already doing that on the web. Rather, it’s intended for the more geeky-minded people that are interested in all the technical details. I’m fully aware that half of the things I’ll discuss here will only produce an increase in cup quality of a few % (e.g., “now let’s sift our coffee grounds for 5 minutes and remove 5 g of the grinds with a 350 μm sieve to achieve a tighter particle size distribution”), but there are some other aspects of brewing that, despite sounding insane, can have a profound impact on your cup quality (e.g., “oh no, this tap water has 200 ppm alkalinity”).
If you are inclined to think that bringing a scientific mindset and sophisticated tools to improve a coffee is not justified, here’s something to consider – most other products that we consume went through much more technical assessment, and we understand more of the science behind them (e.g., wine, beer, cheese, scotch). Somehow, coffee almost never gets this treatment. I’m not sure why, but maybe its being used for caffeine rather than taste might have something to do with it. But that’s a whole other topic about which I know very little.
For now I’ll focus on the V60 method, because it’s cheaper, simpler and easier to carry around for travel. For those not familiar with the V60, it’s basically minimalism for baristas: a conic shaped object, often made of plastic or ceramic, that you put on top of your coffee mug (or other fancy container) to manually brew coffee. It also serves as a convincing argument when a TSA agent asks you what the hell is all that other equipment making up half of your luggage.
2. Percolation and Immersion
Because you constantly pour fresh water over coffee with the V60 method, it’s part of the many methods under the umbrella of percolation brewing. Other examples include batch brewers and moka pots. This is in contrast to immersion brewing, where coffee grounds remain in contact with the same water during the totality of the brew process. Some examples of immersion brews include a french press or a siphon brewer. The main difference between percolation and immersion arise from the fact that fresh water is a better solvent than coffee. In an immersion brew, the speed of extraction decreases as the coffee gets more concentrated, but in a percolation brew, the water in contact with the coffee grounds is almost fresh, so the extraction is always very efficient. You can achieve similar results with either types of brews, but how you navigate across brewing recipes can be very different, and each method has its particularities.
3. Why use a V60 ?
Some people might ask “What’s the point of using a V60 if I have a great batch brewer at home ?” This is a fair question; I think it’s possible to achieve great results with a clean and high-quality batch brewing machine (some coffee experts like Scott Rao also do), but personally I haven’t often tasted great cups of coffee made with batch brewers.
In theory, I don’t see why an automated household brewer couldn’t mop the floor with cups made from manual V60s, but in practice they are often cheap, and never made with the question “how to produce a great extraction ?” in mind, but rather to simply dump water on coffee with the cheapest materials. They are often made of plastic, which I find can impart a bad taste to the cup (this probably depends on the type of plastic). It’s also easy to forget to clean them from time to time, which will eventually make your coffee disgusting (just try to smell the basket of a batch brewer in a hotel room if you want an idea – but really, don’t). They also often come with a relatively large container for water which will go stale if you don’t use it intensely, and that will also result in really bad coffee. Some of these machines also come with a heating element under the coffee jar, which is a great way to burn your coffee and make it even worse.
At most specialty coffee shops, they have decent batch brewers and they seem to clean them often. The problem I most often encounter in that scenario is how long the cup of coffee stayed in the hermetic jar before the staff served it. If it’s fresher than about half an hour, the resulting cup can be super good, but wait much longer than that and it will start to gradually taste like each subsequent level of hell. It will never reach the final level of hell however, this one is only accessible to the worst lattes.

A V60 offers the advantage of potentially producing a great cup (if you do things correctly) with a ~20$ piece of equipment. Plus, it’s really easy to clean and carry for travel, and it’s more flexible than a cheap batch brewer if you want to experiment with your brew recipes.
In my view, there are three challenges when using a V60: (1) being consistent from one brew to the next, (2) not losing a lot of heat from your brew water, and (3) having several of your brew variables intertwined (we’ll come back to what these variables are), leaving you with less control over individual variables.
4. The Brew Variables
There are several brew variables that will affect the taste (e.g., extraction yield) and strength of your cup:
-
- Coffee to water ratio
- Coffee beans quality
- Roast profile and quality
- Grind size
- Grind uniformity
- Coffee freshness
- Filter quality
- Brew temperature
- Water agitation
- Uniformity of extraction and repeatability
- Water quality
- Contact time between water and grounds
- Coffee to water ratio
These are not listed in order of importance, but rather in order that we will discuss them.
4.1 Coffee to Water Ratio
It is useful to describe two relevant ways in which a coffee cup can vary: (1) strength, and (2) extraction yield. Strength is basically just how concentrated your coffee is, e.g. an espresso is much stronger than a filter coffee. The clarity of a coffee cup will be affected by this (but also by many other things). The strength is typically measured in “total dissolved solids” (TDS). It corresponds to the fraction mass of all non-H2O stuff in your cup, and can be measured with refractometers. Some Brix optical refractometers can be bought for ~20 $; (I use this one), but their precision is not great at ~0.1–0.2% TDS (you also need to convert °Brix to TDS with Alan Adler’s relation; TDS = 0.85 x °Brix). Refractometers can be very useful for diagnostics and communication, even though they shouldn’t replace your taste buds. More precise refractometers cost a few hundred dollars. Ideally, you want a brew strength high enough without overwhelming your senses, so that you can appreciate the full aromatic complexity of your cup of coffee. This is a matter of personal preference (and context; an espresso will be perceived as very weak if it has double the strength of a filter coffee), but most people prefer a strength of 1.15–1.35% TDS.
Extraction yield is the total mass fraction of your coffee grounds that was dissolved into your cup of coffee. This variable will mostly affect the taste profile of your cup, because different compounds dissolve in water at different rates. You can use less coffee with a higher extraction yield and end up with the same strength, but you will have a larger extraction yield, and your taste profile will contain more of the aromatic compounds that are longer to extract from the coffee bean. Typical preferred extractions are in the range 18–22%, and a higher extraction yield will correspond to more bitter and astringent taste. If you’re not sure what astringent means, try an unripe pear, or infuse some green tea at 100°C for 5 to 10 minutes. It should be hard not to grin, and will leave a dry taste in your mouth afterward: this is astringency. Lower extraction yields will tend to be sour and have a more vegetal taste. If you know the strength of your cup and the mass ratio of coffee grounds to water that you used for your brew, you can estimate your extraction yield with a simple rule:

There are more precise ways to calculate extraction yield, by accounting for the fact that each coffee ground retains approximately double its mass in water, but in general you don’t need to worry about this.
These variables can be nicely visualized in a 2D graph called the “coffee control chart” (CCC):
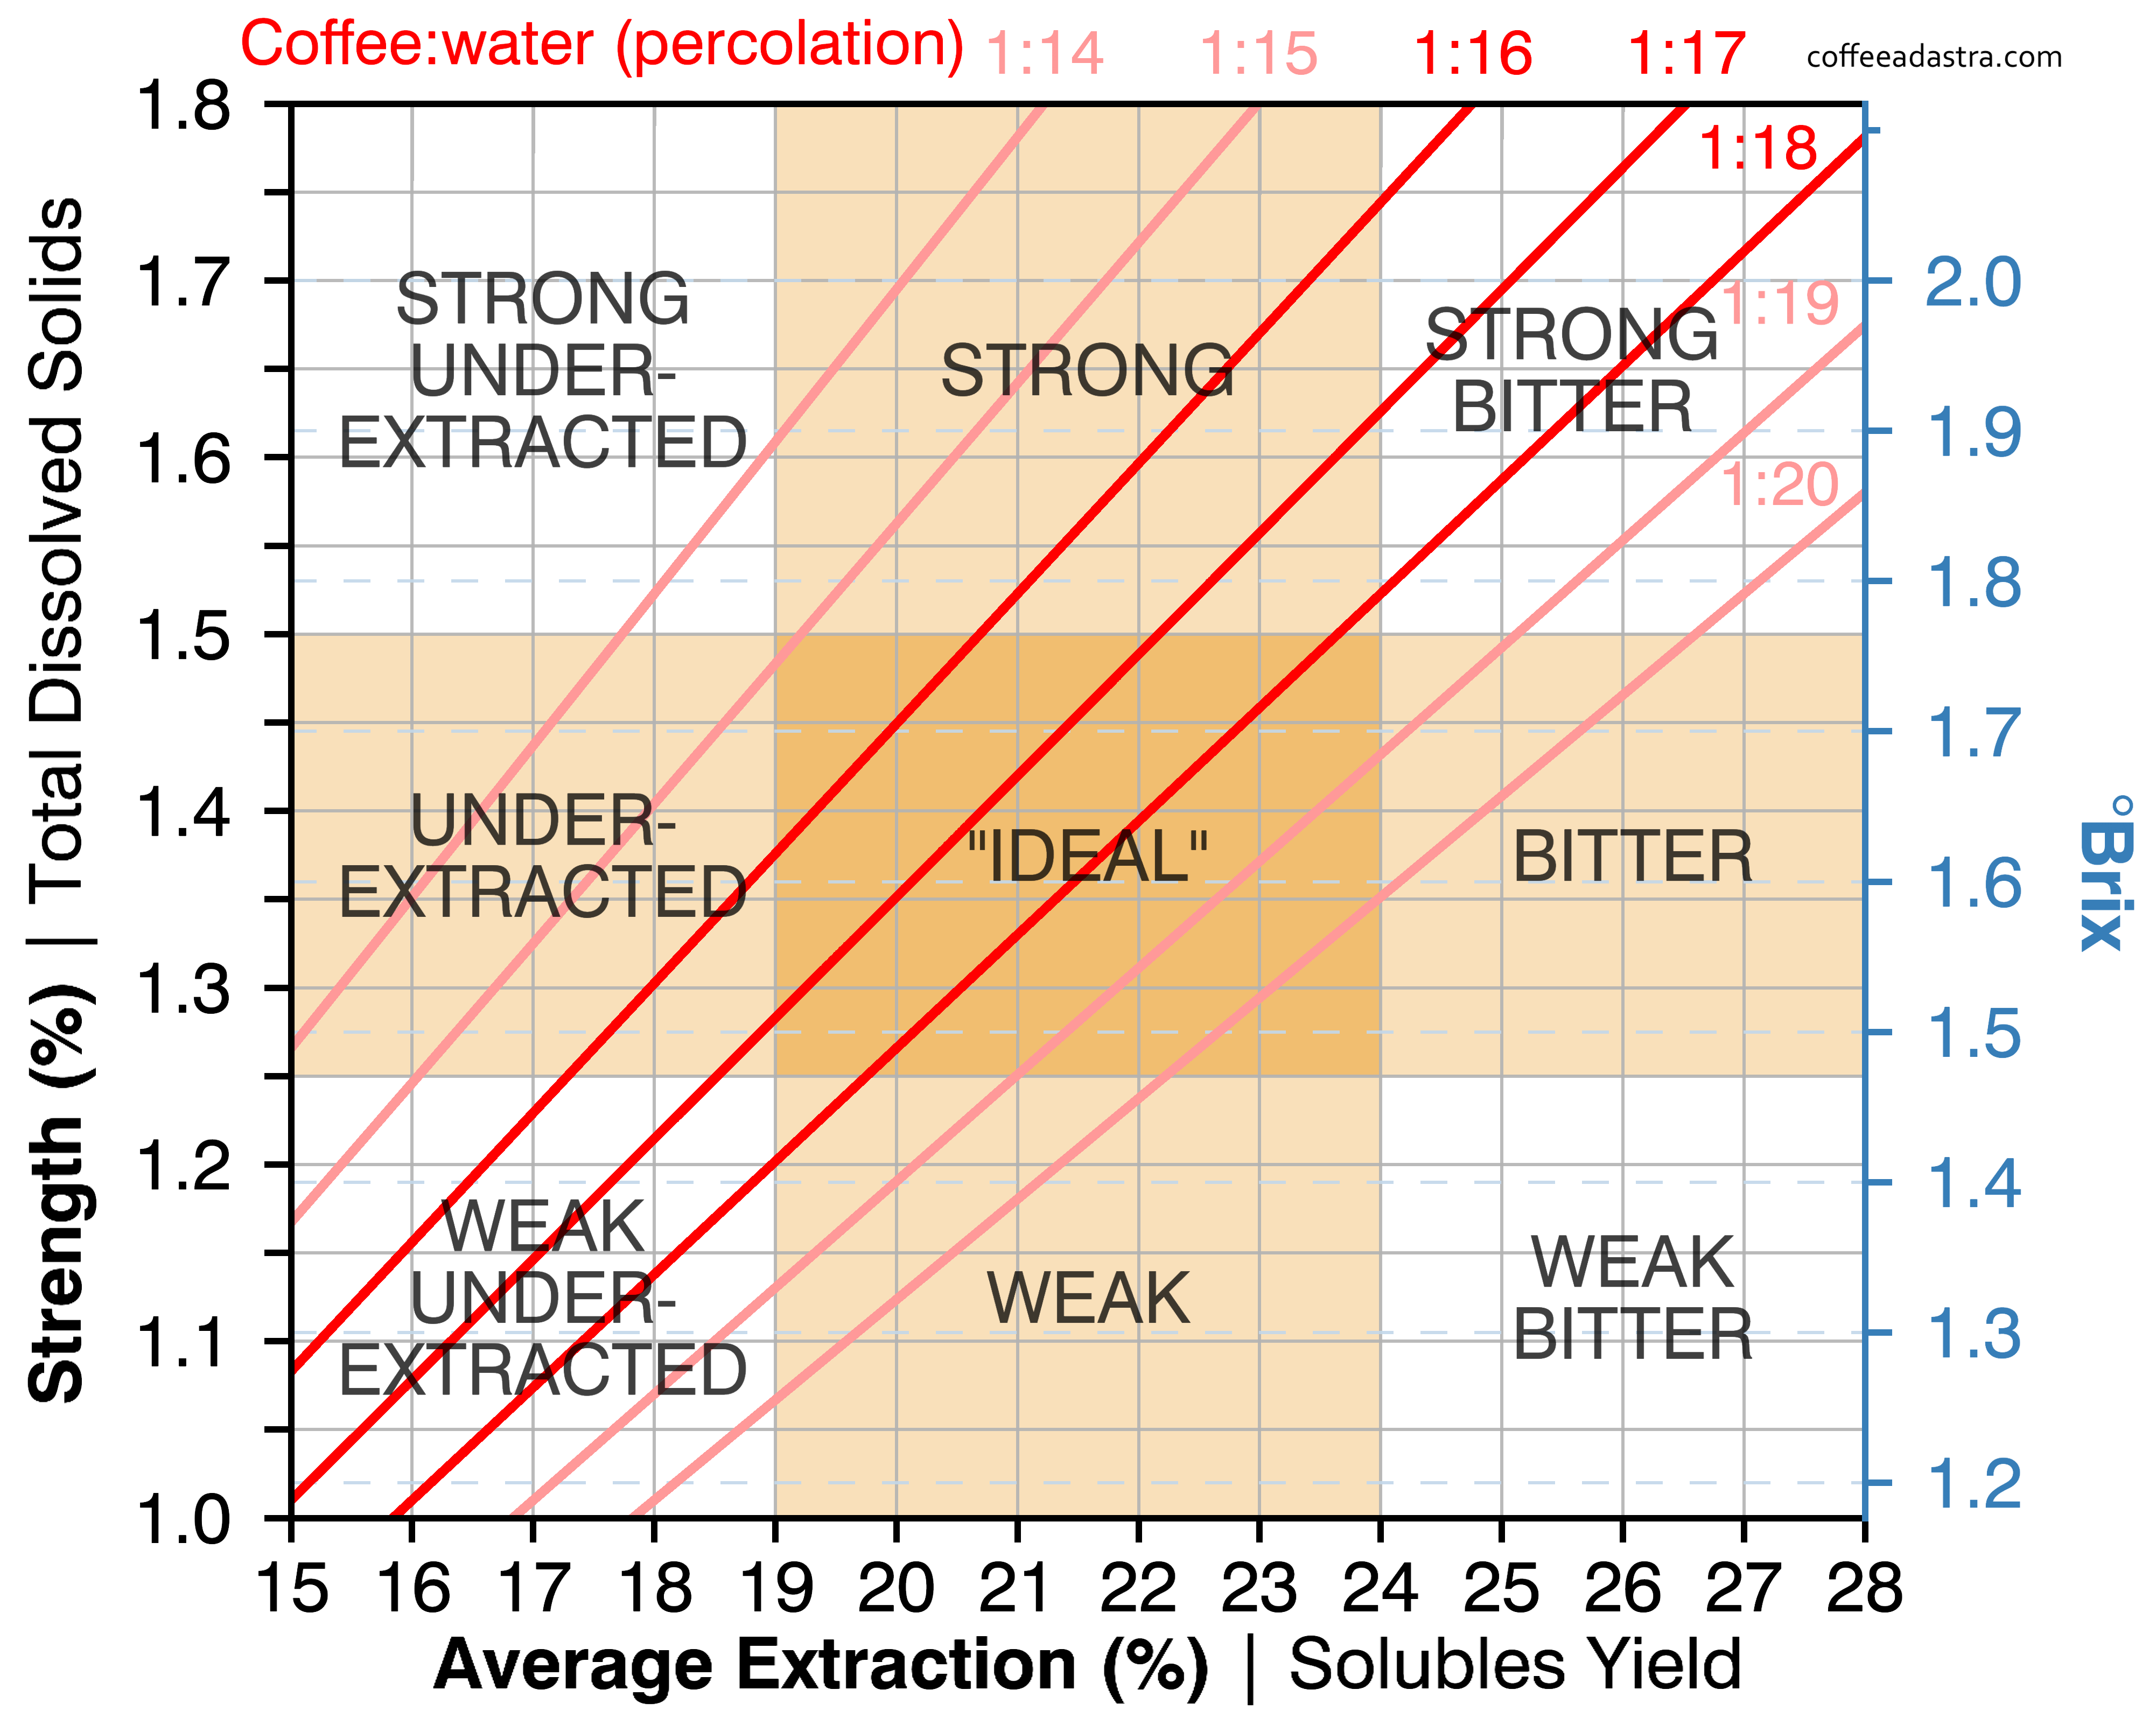
[Edit February 17, 2019: The original coffee control chart that I published here did not account for liquid retained in the coffee bed, and was inappropriate for percolation brews like the V60. Please have a look at my more recent blog post on extraction here, which explains this in much more details. The control chart above has been rectified.]
You can already see from this chart that, if you aim at the typically preferred strength and extraction, you’ll want to use a coffee-to-water mass ratio between 1:15 and 1:17. If you establish that you prefer a strength of 1.3% TDS for example, using a 1:15 ratio will produce a 19.5% extraction yield (more sour), whereas a 1:17 ratio will produce a 22% extraction yield (more bitter). What you prefer will depend on your taste, but also on your brew method and the quality of your equipment. I tend to prefer a 1:16 ratio (I really enjoy 1.25% TDS with 20% extraction), whereas a local coffee shop (Saint-Henri Coffee) uses 1:15 (they prefer higher TDS) and Scott Rao uses 1:17 (he likes higher extraction, and I suspect he also likes a TDS close to 1.25%, being a fan of batch brews). I suspect I might appreciate 1:17 more (with higher extraction yields) if I had a very high quality grinder (more on this in Section 4.3 “Grind Size and Uniformity” below).
[Edit Jan 11, 2019: Please note that all TDS-to-extraction yield calculations in this post are very approximate. I used a simple rule of three while approximating that the beverage weight is just the total amount of water that you poured (see equation above). A much more accurate way to calculate extraction yields for a percolation brew such as a V60 is to assume that dry coffee will retain twice its weight in water. Because of this, your beverage weight will be smaller. A quick way to get a better approximation is to shift two lines to the left in the CCC chart above, only for percolation brews. If you made a V60 with a 1:17 ratio, following the 1:15 line in the graph above will give you a much better estimation of your extraction yield. Thanks to Louis Brickman for pointing this out.]
4.2 Coffee Beans Quality and Roast Profile
Obviously enough, the quality of the coffee bean is important to brew a great cup of coffee. But don’t let yourself think that things end here; there are countless ways to prevent your GREAT and possibly very expensive coffee bean from resulting in a good cup at all, if you neglect any one of the other variables.
I personally prefer lighter roasts, as they retain more of the flavor character in the original coffee bean. Darker roasts correspond to coffee that was roasted for a longer time, and where the aromatic organic compounds were caramelized for a longer time. This will produce a cup with much more body, but you might also notice that different beans will taste more similar with darker roasts. Dark-roasted coffee is also more tricky to preserve without it going stale. When you buy mass-produced cheap coffee, they will tend to be roasted dark because lower quality beans can be used without a noticeable difference after roast. When you buy specialty coffee from hipster coffee shops, they will tend to be lightly roasted to highlight the differences between different coffee origins. If you happen to prefer dark roasts, it doesn’t mean you have poor taste, but you won’t need to worry as much about the origin of your coffee beans. Dark roasts also somehow seem to produce a lot more static electricity, which means your coffee grounds will easily stick to the sides of your grinder (and even V60 !), and they will also de-gas a lot more CO2 when you start brewing. They kind of give me nightmares.
Another aspect to consider is the quality of roasting. It is totally possible to have a great coffee bean and a roast profile that you enjoy (e.g., a light roast in my case), and not to be able to brew a great coffee with it whatever you do. One example would be baked coffee, which I suspect happens more often that we may think. The only recommendation that I can give here, is try notice who roasted your coffee, try different roasters, and remember those that you liked the most.


4.3 Grind Size and Uniformity
Grind size will have a significant effect on your brew, because finer grounds have more surface area in contact with water, and will therefore extract much more rapidly. When you do filter coffee, the dominant extraction happens by diffusion, meaning that water needs to diffuse into the pores of the coffee bean cells, grab some stuff, and diffuse out through the same pores. We’ll talk more about this when we discuss water quality. If you go as fine as espresso-type grinds however, you enter a new regime of extraction where individual cells in the coffee bean are broken. This allows water to easily dissolve everything inside the coffee cells very easily (this extraction regime is called erosion).

Here we’ll focus on filter brews, and we’ll think specifically about diffusion (although some erosion still happens in filter brews because of the finest coffee particles in the distribution, often called fines). A larger surface area will allow the water to enter the coffee cells more efficiently, therefore extraction will happen faster. When brewing a V60, finer grinds will result in a stronger cup with a higher extraction yield, at a fixed contact time between water and coffee. However, finer grinds will also slow down your flow of water through the coffee bed (water has to take a longer path through the coffee, and coffee fines will clog some pores in your paper filter), which means that your cup will have even more strength and a higher extraction yield. In other words, the resulting brew in a V60 is very sensitive to your grind size.
Another important aspect of grind size is that most grinders are unable to produce a very narrow range of particle sizes. Higher quality grinders will produce a narrower particle size distribution, which is desirable because it will allow you to extract each coffee particle at the same extraction yield. Below you can see an example of a particle size distribution for a Lido 3 hand grinder, compared to the (just slightly) more expensive Mahlkonig EK43 automatic grinder. I chose a grind setting that produces the same average grain size, but you can see that the Lido 3 has a much larger number of fines and a flatter distribution of particles of diameters ~0.6–1.5 mm. I also show a similar distribution for an entry level Porlex manual grinder, where the difference in particle size distribution is quite stark. It would make more sense to compare the total mass of grinds at each surface, rather than the number of grinds at each diameter, and to compare distributions of the same weight-averaged surface rather than the average diameter, but I still find these figures illustrative to make my point, as we won’t be actually tasting the resulting coffee.
You can imagine the resulting coffee cup as a collection of smaller coffees, each of which is made with particular grind size on these histograms, and the resulting cup will be the average of all of these grind sizes (so, all smaller coffees are poured inside your mug). In other words, the resulting brew will be an average of several different points on the coffee control chart; some will be over extracted, and some will be under extracted. In a case like the Porlex grinder, you won’t be able to reach average extraction yields of ~20–22% without a significant amount of fines over-extracting, which would result in an unpleasant astringent cup. You will therefore be forced to stay in the range 18–19%, and you won’t be able to taste the full potential of your coffee beans. I used the Porlex for a while, and although I didn’t have a refractometer at the time, I’m pretty sure my extraction yields were around ~18%. I still enjoyed my pour over cups, but I did puzzle over why it tasted so much better at the coffee shop (water quality was an even bigger reason for this however, as we’ll discuss later).
Generally you will get a narrower particle size distribution by using burr grinders; the larger the burrs, the more uniform the particle size distribution will be. An alternative way to improve your particle size distribution is to use a sifter, like the Kruve. However, filtering out fines takes at least 2–3 minutes, and will require you to throw away a non-negligible fraction of your coffee. Still, you won’t be getting a perfectly uniform particle size distribution, because electrostatic forces cause a significant amount of fines to stick on the surface of larger grinds, and those won’t be filtered out. I am tempted to experiment with pressured CO2 (to avoid oxidizing grinds) or statically charged balloons to get rid of these sticking fines, but that’s for another day.
I will eventually experiment with the Kruve and report whether I find something interesting, but doing so is not as simple as the manufacturer wants you to think – they suggest to just filter out fines and brew as you would. If you do this, the water flow through your V60’s coffee bed will be much faster, and your resulting cup will be extremely weak and under-extracted. I had a few good laughs watching YouTube videos of baristas comparing a Kruve vs non-Kruve cup of coffee using the same brew recipe in a blind tasting, and choose the non-Kruve cup every time, to their dismay and confusion.
One last note on grinders – avoid blade grinders at all costs. They will create an extremely wide particle size distribution, but they will also overheat the grounds, which will deteriorate the taste of your coffee. James Hoffmann actually made an interesting video of some tricks to follow if you were stuck on an island with just a blade grinder and some coffee.
4.4 Coffee Freshness
One of the difficulties in brewing good coffee is to keep your beans fresh. From personal experience, I find that it’s best to buy your coffee beans between ~1 and ~3 weeks after their roasting date (assuming they are properly packaged). If the coffee is fresher than this, it will degas a crazy amount of CO2 (accumulated during roasting), making it harder to brew it properly, and if it is too old, the coffee will develop noticeable defects in its flavor.
The four big enemies of coffee beans are oxygen, humidity, heat and UV light, so you should make sure that you shield your beans from these four elements. When you buy a bag of fresh beans, make sure that the package is not transparent, and that it has a one-way valve on it; this will allow the coffee to de-gas CO2 (accumulated during roasting), and prevent oxygen from entering the bag. Ideally, the bag would also have a ziplock-type re-closable opening, and it would be small enough that you will finish it within a week or so. Avoid buying pre-ground coffee; it will go stale orders of magnitude faster, making it hard to even run back to your house and brew a single good cup of coffee. Keep the bag of coffee upside if you can; this will keep the most amount of CO2 inside the bag, which acts as a protection against oxygen.
Once the seal on a bag of beans is broken, it will start going stale much faster. This is because all CO2 will immediately leave the bag (usually with a great smell of volatile aromatics), leaving the beans without protection against oxygen. Most of the CO2 de-gassed in the first few days, so the coffee beans won’t build back that protective chamber of CO2. Every time you re-open and re-close the bag, a little more oxygen will enter, accelerating the staling process. One way to get around this is to split your coffee beans in pre-weighted doses, in small individual ziplock bags. Just make sure these bags are food grade ! Currently I use plastic-aluminum bags of 7.7×10 cm which can store up to 22 g of coffee. Some other non-food grade bags have a very foul plastic smell. It is best to use bags as small as possible to minimize the amount of air enclosed, and to get as much air as possible outside the bag before closing it. I recommend doing this right after you open your bag of fresh coffee.
[Edit January 7, 2019: I found that the ziplock bags described above do not keep a good seal. They are also too small for any dose above 22g. I switched to using these plastic-only ziplocks now, or a cheap-ish vacuum sealer which is by far the best option.]
Do not forget to put these ziplock bags in an opaque container, and to keep them away from heat and humidity (I often put then back in their original coffee bag). If you want to go one step more crazy (welcome to the club), you can buy pressurized inert gases (typically CO2, nitrogen and argon) and shoot some of those inside the bag before closing it back, to vent out all oxygen. The cheapest way to get these is to find a local specialty wine store near you, because shipping can be quite expensive for this type of item. A worse but simpler alternative is to simply inject inert gases in the original coffee bag (or a better container like the Planetary design Airscape), but every time the bag is opened, the staling will happen a bit faster until you close the bag back up with its inert gases, because the beans will have lost all ability to de-gas CO2. Just using an Airscape without any extra complication is already much better than leaving your beans in your coffee bag, unless it has a zip-lock closing and a hermetic inner lining (in the latter case, make sure you press any air out from the bag each time before closing it).
If your goal is to keep some coffee fresh for later use (say, more than one month), I recommend freezing your beans. You have to do so carefully however; freezing will slow down the staling process, but could also expose your beans to foul odors and humidity if not done properly. As a first step, I highly recommend pre-dosing your beans in small zip-lock bags, because you really want to avoid de-freezing and re-freezing your beans. Put the zip-locks in a hermetic container (e.g. a hermetic Tupperware), and take out only the amount of doses that you need at a time (quickly putting back the container in the freezer). Take them out of the freezing at least a few hours before using them, don’t open the zip-lock, and store them somewhere away from the 4 aforementioned elements. The reason for waiting a few hours is (1) to avoid water condensing on the cold beans (remember, humidity is bad), and (2) to avoid grinding the beans while cold. The latter is because grinding beans while cold causes shattering (Uman et al. 2016), resulting in a larger amount of fines. This is ok for espresso, but it is not great for filter brews. You can take out a few days worth of zip-lock bags and store them in your opaque coffee bag, especially if you sealed your zip-locks with inert gases.
It would be even more awesome to store coffee beans under positive pressure (especially in a CO2-filled container), because it would prevent them from de-gassing, and therefore they would still have their ability to de-gas their CO2 as protection after opening the container. Sadly, I haven’t found an easy solution to do this at home.

4.5 Filter quality
The filter that you use with your V60 will have a strong effect on your extraction time. This surprised me quite a bit, but it makes sense if you realize that different types of paper have different pore sizes. I don’t think that the pore size matters that much in the end, as long as you find a recipe you like and don’t change filters after this.
Another aspect that coffee filters can have is their impact on the taste of the coffee. As we will see later, there is a pre-infusion step in V60 recipes where you pre-wet the filter with hot water, to get out the paper taste as much as possible from your coffee cup. In order to verify the impact of paper filters on the cup, I tried to infuse four different filters in hot water, wait for the water to cool down and tasted them. Specifically, I tried the Hario V60 natural filters, the Hario V60 bleached filters, the Hario natural siphon paper filters, and the small circle-shaped Aeropress bleached filters. Only the first two can be used in a V60 pour-over, but I was curious. I found that both the bleached filters imparted less taste in the final cup, and that the Hario V60 natural filter had the strongest taste, which reminded me of wet cardboard. However, I tried this experiment a second time after having pre-washed each filter with hot water (as we do when we prepare a V60), and I could barely notice any difference. In other words, as long as you pre-wet your filter correctly, it shouldn’t have a strong effect; note that this might not be true of other V60 filter brands (you’d have to experiment yourself). I still chose the bleached Hario V60 filters, just in case.
There are also cloth filters available for V60, and more often with siphon brewers. I’ll talk about siphons in a separate post, but after a lot of experimentation, I highly recommend never to use cloth filters. They can produce a great cup the first time or two (with more body than paper filters), but then keeping them clean of coffee oils and bacteria quickly becomes a nightmare. I think using them properly would require boiling them with a strong odorless chemical (e.g. Oxiclean) after every use, then abundantly rinsing them with fresh water (potentially boiling them a few times in clean water), and storing them in a closed container in distilled water, in the fridge (for no more than a week or so before their next use). Just a bit extreme.
4.6 Brew temperature
As I mentioned earlier, achieving a high enough and stable temperature is one of the main challenges in V60 brewing. To my knowledge, currently there isn’t much solid data backing up brew temperature recommendations, but most people recommend 91–94°C (for you weirdos in the USA; 196–202°F). Matt Perger, an influential coffee expert, suggested that the highest possible brew temperature is great too, because you can’t burn your coffee. While I agree with this (roast temperatures are much higher than brew temperatures), you need to keep in mind that different chemical compounds in the coffee bean extract at different rates, and these rates depend on the water temperature. If you brew at much different temperatures, the relative extraction rates of different compounds will be very different, and the resulting flavor profile of your cup will also be very different. Ever wondered why cold brew coffee has absolute zero acidity ? It’s because acidic compounds only extract at high temperatures. I experimented a bit with brew temperatures higher than 94°C in a siphon brewer (it’s very hard to get there with a V60), and I didn’t really enjoy the result, but I need to explore this more before having an informed opinion.
When brewing in a V60, I recommend achieving the highest possible water temperature in your kettle, because you will lose a lot of heat in the pouring process, and it’s easy to fall much below 91°C, which will result in a more under-extracted sour cup. The coffee grounds, V60 and surrounding air are all much cooler than your water even if you pre-heated everything, so your brew temperature will hardly ever exceed 93°C. For this reason, Scott Rao recommends using a plastic V60 because it is a better insulator than ceramic or glass V60s, and I fully agree with that. I experimented brewing with different V60s and different methods holding a thermometer in my slurry (the mix of brewing water and coffee grounds), and found that the plastic V60 is indeed much better.
Another cause of worry with brew temperature is the amount of water you pour at a given time. If you pour your V60 water in a lot of tiny batches (WHAT IS THIS ?), you can be sure that the extraction temperature will be much below 91°C. Maybe you will like the resulting taste, but you should also try a higher brew temperature before deciding.
I’ve heard baristas recommend me to bring water to 99°C instead of boiling it to get a better cup of coffee. However, I haven’t seen much convincing evidence or reasoning behind this. I remember reading somewhere that most oxygen is lost at boiling point, and that it may be somehow important for brewing, however given the amount of pseudo-science going on in the coffee brewing game, I don’t think I could recommend this with a straight face.

4.7 Water Agitation
The efficiency of extraction depends a lot on the contact surface between water and grounds. The speed at which you pour water over your coffee grounds will determine the amount of turbulence that ensues (faster flows will cause more turbulence). One thing turbulence is great at is balance everything out by creating gigantic, fractal-like contact surfaces. Balancing out water and coffee is another way of saying extracting the hell out of your coffee. I don’t think that high or low levels of turbulence are necessarily a problem in themselves, but I suspect that using reasonably high turbulence is a way to facilitate the repeatability of your brew.
The beak of your kettle will have an effect on turbulence (you might notice some vortices at the surface of your slurry while you pour), the height from which you pour, and any up-and-down motion (i.e., accelerations in your flow) will also affect turbulence. You should avoid up-and-down motions because they are hard to exactly reproduce every time, and you should try to pour water from the same height every brew. I personally like kettles with a long, small-opening beak because they create a nice amount of turbulence without splashing the coffee grounds everywhere.
I recently ordered a product called Melodrip which allows you to imitate the flow of a batch coffee brewer, but I still have not experimented much with it. The instruction manual comes with a brew recipe that will probably produce something more similar to a cold brew cup (with more than 10 tiny pour stages…), but using the Melodrip without any modification to my current recipe creates so little turbulence, or agitation of the coffee bed, that it produces an awful sour cup. I suspect it’s possible to improve repeatability if I experiment with it and come up with an adapted brew method.
4.8 Uniformity of Extraction and Repeatability
Having a uniform extraction is somewhat analogous to having a uniform particle size distribution; you don’t want to over-extract some of your coffee grounds, while under-extracting others. There are several problems that can prevent you from achieving a uniform and easily repeatable extraction.
Channeling is one of the biggest problems for a uniform V60 extraction. Dry coffee grounds tend to repel water, so when water has created a path across the coffee bed, all subsequent water will tend to keep passing there, and a significant fraction of your coffee grounds might stay dry. One way to avoid this is to agitate the slurry with a spoon or stick (which Scott Rao recommends in his V60 pour-over video), but unless you are a well-oiled robot, this method has a draw back: repeatability. Playing with the slurry will have a very strong effect on the efficiency of extraction (by creating a lot of turbulence, and presenting the coffee grounds with higher-velocity fluid), and it will be extremely hard to agitate the slurry by the exact same amount every V60 you brew. Therefore, this will result in a more even extraction by virtually eliminating channeling, but from one cup to another you might be producing weaker and stronger brews. Scott Rao told me that he now does his famous Rao spin instead of agitating the slurry, as a more repeatable way to decrease channeling. I’ll discuss this more below with Scott Rao’s latest recommended method to brew a V60.
In a cone-shaped V60, one region that tends to remain dry often is a small cone-shaped region near the center of the coffee bed, slightly below the surface. I’ve seen some baristas online dig a small trench with their finger or finger joint before pouring water to avoid this. I haven’t really experimented enough with this yet to be sure that it does help, but I think there is good reason to think it might, and it’s easy enough to do.
[UPDATE: See my second blog post for an update on the trench method].
Another common problem in V60 brews are “high-and-dry” grounds, i.e. grounds that stick to the walls of your filter. If you try to knock them off just by pouring water over them, you’ll end up pouring most of your water around the edges of your coffee bed, where you want to distribute your water as uniformly as possible across the coffee surface. The brew method developed by Scott Rao deals with this by spinning the V60 around at various stages of the brew. Using a regular kettle without a precision beak can vastly worsen the problem of high-and-dry grounds.
4.9 Water quality
The last, but not the least: water makes all the difference. I’m not talking about the taste of your water, or whether you put it through a Brita filter (although all of this is good). I’ve heard too many times “coffee is made of 99% water, so your water better taste great”. This is true, but beside the point. Some water tastes great and makes shitty coffee (looking at you, Montreal.) The main problem here is extraction. Water has to get inside the cells of the coffee beans, and come back with the good stuff, and not all types of water will be able to do this efficiently. Specifically, the content in alkaline buffers and minerals (specifically, calcium and magnesium) are of paramount importance.
This might sound crazy, or too complicated to care about, but if you have any doubt, here is an experiment for you to try: buy a bottle of water (e.g. Evian), and brew a coffee with it. Using the same exact coffee and recipe, brew another coffee with your local tap water. Then, do the exact same thing with distilled water. Try the three cups of coffee, and see what I’m talking about. The one made will distilled water will be the weakest cup you have ever seen, and the one made with the bottled water should be quite strong, and have a dull taste without acidity (assuming you use a typical brand – they almost always have crazy high amounts of minerals and alkaline buffers). Depending on where you live, the tap water coffee might be located anywhere in between these two cups. Most of the time, it will be a bit weak and lack body, something that you won’t be able to compensate by playing with the other variables.
This is something I discovered only recently, and I was always astounded at how the coffee tasted different when I traveled, and even how much my V60 extraction time changed when I used bottled versus tap water. All of this felt like total chaos, but it wasn’t. Even coffee experts started realizing this relatively recently (as you can see in this 2016 conference) – before that, some world barista champions fine-tuned their recipes at home, traveled to the championship country, and crafted the worst cup of coffee in their life, then came back home only to have never-ending nightmares to cope with their perception that truth doesn’t exist and nothing makes sense. Now, world barista championships use tightly controlled water composition, which is announced much before the competition. Even your favorite hipster-y specialty coffee shop probably has a refined water filtration, reverse osmosis and/or re-mineralization system, depending on the local tap water composition.
There are 4 aspects of water that you want to control when brewing coffee, in order of importance:
-
- Total alkanility
This is the total mass fraction of HCO3– negatively charged ions (anions) in your water. This is often called a buffer because it will react with free H+ radicals, and prevent water to become more acid (smaller pH). Therefore a high total alkalinity makes your water more stable against changes toward more acidity. If this is too high however, the HCO3– anions will start to react chemically with your coffee flavors, and it will taste dull and flat. The Specialty Coffee Association (SCA) recommends ~ 40 mg/L total alkalinity. - Total hardness
This is the total mass fraction of Ca+ and Mg+ calcium and magnesium positive ions (cations) in your water. These cations are responsible for bonding with coffee flavors inside the coffee cells, and bring those back in your coffee cup. They don’t bring the exact same stuff back, so it’s good to have both, but this is still an active area of research. The SCA recommends a total hardness of 17 to 85 mg/L. - pH
You don’t want free H+ or OH– radicals to start reacting with your coffee, so you’ll want to have a pH near 7 (neutral). The SCA recommends a pH between 6.5 and 7.5. - Cleanliness and good taste
This shouldn’t pose any problems if you started from distilled water, but basically you don’t want chlorine, too much sodium (SCA recommends less than 10 mg/L sodium), or more generally dirt in your water.
- Total alkanility
I’ll describe some ways to get water with properties in this range below, in Section 7.2 “The Water I Recommend”.
[Update: See my third blog post for a much more detailed discussion of water quality]
4.10 Contact Time
As you might have guessed, contact time between the water and grounds will have an effect on both the strength and extraction yield of your brew. However, in a V60 you don’t really have a direct control over this variable, so you can view it as more of a consequence of all other variables. Your filter type, water composition, roast profile, type of beans, and pour over method can all have surprisingly significant effects on your contact time. It is a good habit to note them down from one brew to another, as it is a good way to see how well you were able to reproduce your last brew.

5. Determining Grind Size
It is typically quite hard to communicate grind size efficiently, so you will have to experiment a bit to figure out what works best for you. Scott Rao recommends grinding finer and finer (not changing any other variable) until you can taste astringency, and then go back one notch on your grinder. Another way to do this is to brew a few cups and blind taste them.
With the Lido 3 grinder and a 1:16 ratio, I found that I prefer what I call mark 9 (see picture below for guiding). To identify it, unscrew the grind size screw all the way up, and count the marks from the right to the left, starting from the reference symbol on the Lido 3 (it looks like this: O|o).
The first mark is located very near the reference symbol and counts as mark 1. When you counted all the way to 9, place the blue marker there and tighten back the grind size screw carefully. Always make sure you hold the bottom of the metal part of the Lido 3 before you unscrew the plastic recipient containing the ground coffee, otherwise you might shift the grind size.


6. Practicing the Rao Spin
I recommend viewing this video to get a grasp of what the Rao Spin method is. Even after having watched it, you might find that you end up just shaking the slurry back and forth in a back-and-forth linear motion rather than circular motion when you try it. Here’s a way you can practice your spin without producing a lot of sub-par cups.
Grind 10 g of coffee with the finest grind that won’t damage your grinder. Place your V60 on a mug, put a filter in, and pre-wet it with your faucet. Put the fine coffee in the filter and slowly fill it with tap water. The coffee grounds should quickly start clogging the filter, which will allow you to have a good amount of water in the V60 without it draining efficiently. Now you can start trying to do the Rao spin. Try it with both hands, or with just your left or right hand. Try to do a clockwise or counter-clockwise spin. There’s a good chance that one of these combinations will work best for you (I find it easier to do a clockwise spin with just my right hand). You will find that there’s a small lag between the small circular motion that you induce in the V60 and the motion of the fluid itself; I found that getting used to this lag and adjusting it properly is key to getting a circular motion rather than a back-and-forth linear motion. It’s also important to not spin when the V60 is too full, and to adjust the amplitude of motion so that you don’t get a spillover.
Something that can prevent you from easily doing the Rao spin is a non-circular mug, a mug with an opening that is too small, or a non-conic shaped V60-type brewer. Using a ceramic V60 will complicate things because, being a great conductor of heat (and a bad insulator), the V60 will get very hot to the touch.
7. How To Actually Make a Better V60
After having explained all of the considerations behind making a good cup of V60, here’s a list of actual practical recommendations for brewing a better cup of coffee.
7.1 The Gear I Use
Here’s a list of the V60 gear I use. I’m tentatively ordering them in decreasing order of importance in terms of impact on the cup quality.
- The Lido 3 grinder (I think the Comandante grinder might be as good). If you are rich and have counter space, get yourself a Mahlkonig EK.
- A plastic Hario V60 (plastic is better for heat retention).
- The Brewista Artisan gooseneck kettle (it’s very precise, and very beautiful; the Bonavista or Hario precision kettles are very good too).
- Hario V60 bleached paper filters (they’re the white ones).
- Acaia scale (a Hario scale would be as good for this, but Acaia can be programmed to yell at you if you pour too much water).
- A mug. To pour the coffee in. A Hario pour over recipient would be more practical when making coffee for two.
- Gorgeous Bodum double-walled degustation glasses.
7.2 The Water I Recommend
Right now I use Dan Eil’s water recipe. It doesn’t require too many hard-to-get minerals, and it’s just great for coffee. I haven’t experimented enough with different water recipes, so this might change with time.
First, you need to get yourself some magnesium chloride (MgCl2), calcium chloride (CaCl2), potassium bicarbonate (KHCO3), distilled water and a regular-sized mason jar or something similar to it (don’t worry, we won’t be preparing triple distilled mason water). Please make sure you are ordering food-grade (not lab-grade, of pharmaceutical-grade) products. Lab-grade may seem great because it has less contaminants, but the contaminants can be very nasty for your health (e.g., heavy metals). You’ll also need a pipette (a small spoon might do) and a precise scale, ideally something at 0.1 g precision or better (e.g. this thing). Another perfectly acceptable buffer would be the more readily accessible sodium bicarbonate (NaHCO3) – you’d need to use 1.68 g instead of 2 g of it to get the same amount of HCO3– anions (see below), but then you’ll be adding sodium (Na+; ~23 mg/L of it) as well as HCO3– buffer in your water, which could affect the taste of your coffee (the SCA recommends having less than 10 mg/L sodium in your water). On the other hand, adding potassium (K+) in your water is not a problem because coffee beans are already full of it, so it’s unlikely that will affect the taste of your cup.
First pour 194 g distilled water in the mason jar (you can use a Hario scale to weight that if your precise scale cannot go this high). Add 2 g CaCl2, then 2 g MgCl2, and 2 g KHCO3. Bubbles should appear and the solution should become white and opaque. Shake it well with a spoon, then let it sit still for a few hours, with the mason jar top on it, but not screwed (so it can degas without blowing). After a few hours, you can stir it up to make sure it doesn’t degas too much anymore, then screw up the lid. This is your minerals concentrate, which you can keep in your fridge.
Now get yourself a large container of distilled water (e.g. 4 liters), and put 10 g/L of concentrate in it (for a 4 liter container, you need 40 g of concentrate). To do this properly, you can place the concentrate on a scale, tare it, then take out some concentrate with the pipette until the scale reads -40 g. Every time you take out some concentrate, you should stir the solution with the pipette, because it quickly precipitates, and you don’t want to preferentially draw concentrate that is too diluted. Shake the water container well, and keep it in your fridge. This is your water for brewing coffee.
If you find that this is too complicated, then a simpler and good option is to get yourself some Third Wave Water (filter coffee profile) and dissolve a bag in a gallon of distilled water. Distilled water is very cheap and can be found in most grocery stores or pharmacies. Third Wave Water is not too expensive, lasts for several gallons of water, and it’s quite decent for extraction. I like to have a few extra bags of it for in-depth diagnostics when something’s wrong with my coffee, to eliminate as many variables as possible.
A somewhat simpler approach would be to mix some bottled water with distilled water, although you need to choose a brand of bottled water that already has the right ratio of total hardness to total alkalinity. I won’t make recommendations right now, but I plan to write something up about this soon.
Whichever method you choose, make sure to always keep your gallon of “coffee water” in your fridge, and don’t let it stand there for more than 2 to 3 weeks (assuming you started from distilled water, which you should have), especially if it’s almost empty. Always smell the water before using it; if it smells like an old rag, it means bacteria built up in your gallon, and your coffee will taste like an old rag.
[Update: See my third blog post for more explanations and more water recipes]
7.3 A V60 Pour Over Workflow
Here are the steps I follow when I brew a V60 cup of coffee:
- Get a bag of coffee that was roasted between ~1 and ~3 weeks ago.
- When you’re ready to brew your first coffee, open the bag and split the beans in pre-dosed batches of 22 g in small ziplocks. Make sure to expel as much air as possible before closing. Put ziplocks back in the opaque coffee bag. Put your coffee bag away from heat and moisture. Optional: Put some inert gases in there before closing the bag. Optional: Put some of them in the freezer (see Section 4.4 “Coffee Freshness”).
- Start boiling some water to 100°C. Use high-quality water with the right alkalinity and mineral content (see Section 4.9 “Water Quality”).
- Drop a pre-dosed 22 g of coffee in your grinder. If you don’t have a pre-dosed bag, weight 22 g of coffee now and drop it in your grinder.
- Place the plastic V60 on your cup, on the balance.
- Take a V60 filter, fold its thick side and place it on your V60.
- When the water boils, thoroughly pre-wet the filter.
- Place your kettle back on its base and re-heat it.
- Drop the pre-wet water in the sink.
- Grind your coffee.
- If your grinder tends to retain some coffee grounds, gently tap it with the palm of your hand.
- Tare your scale.
- Pour your coffee in the V60. Do you measure 22 g ? If not, your grinder retained some coffee grounds.
- Gently shake your V60 to get an even flat bed of coffee grounds.
- Dig a small shallow trench with a finger in the middle of the coffee bed.
- Tare your scale again.
- Start a timer.
- The bloom phase: pour 66 g of water with a uniform and somewhat fast flow, starting from inside the small hole. Wet all beans uniformly across the surface by preferentially hitting the darker regions with fresh water. If your coffee is fresh, it will release lots of CO2. If you are brewing a very dark roast, it will form a large dome of hell that will summon Ihsahn, who will ensure that your coffee tastes like the devil.
- Immediately after you hit 66 g, gently hold the V60 and do the Rao spin (see description above). If you haven’t yet seen bubbles, your coffee might be stale.
- Ideally you will have completed steps 18 and 19 within 15 – 20 seconds. Wait until the timer reads 30 seconds (you might see bubbles coming up from the slurry).
- Start gently pouring water, hitting the dark regions preferentially, and describe spirals over the surface of the slurry so as to hit every part of the surface as evenly as possible. Stop around ~200 g, or when the water is near the top of the V60’s height. If you see bubbles starting from now, it means your bloom wasn’t perfectly executed (it does take some practice).
- When water is not too high (~2/3 of the V60 height), do a Rao spin.
- When the water height approaches that of the coffee bed, start pouring again, until you hit 352 g (for a 1:16 ratio). Don’t let the coffee bed appear (to avoid having the temperature drop too much).
- When water is low enough again, do another Rao spin.
- Wait for the water to flow through completely and note your full extraction time. This time will depend on a lot of things (see Section 4.10 “Contact Time”), but typically it will range from ~2:30 to ~3:30. Higher-quality grinders will typically have you converge on shorter extraction times. You can compare your future brew times to see how consistent you are.
- Swirl your coffee around if you’re going to share it or drink it directly from the recipient you poured it in. The coffee will have sedimented a bit, so this will even things out.
I highly recommend looking at this V60 pour-over video by Scott Rao for initial guidance. The method that I recommend above is very similar, except (1) he does one pour instead of two; (2) during bloom, he agitates the slurry with a spoon instead of a Rao spin; (3) he doesn’t dig a small hole in the coffee bed; and (4) he uses a 1:17 ratio; and (5) he gently induces a rotation at the surface of the water after the full pour. Modifications (1) and (2) were also designed by Scott Rao who told me about them after he published his V60 video. Modification (3) is discussed in Section 4.8 “Uniformity of Extraction and Repeatability”; modification (4) is discussed in Section 4.1 “Coffee to Water Ratio”; and modification (5) is just based on my noticing that I did not need to do it to avoid having “high-and-dry” grounds. I suspect this is a consequence of doing two pours instead of one (and therefore two Rao spins).
If you’d like to dig deeper in some of these methods, I highly recommend Scott Rao’s books.
Special thanks to Sandie Bouchard for proofreading.
8. References
- Scott Rao’s blog and Instagram (both contain a wealth of information).
- BaristaHustle
- The Specialty Coffee Association
- Uman et al. 2016, “The effect of bean origin and temperature on grinding roasted coffee“, Nature scientific reports, 6, 24483
- Special thanks to Sandra Wolter and Victor Malherbe for sharing coffee tips with me.


Hello Jonathan,
I love this blog!
I have a couple of questions:
1) When we do main pours, is it a good idea to pour from relatively high height to create as much turbulence in the slurry as possible and to pour slowly (thin stream) to support percolation rather then immersion?
2) You pour slightly less water in 1st main pour compared to 2nd whereas Scott Rao recommends here in comments https://www.scottrao.com/blog/2017/9/14/v60-video to pour more water in 1st pour to ensure the temperature is high enough. (up to 250g 1st from 340g total – 20g/1:17). Could you explain why your approach is different?
3) Local barista told me that he uses lower temperature (92C) for naturals and higher for washed coffees. Whats your opinion on that?
Thanks!
LikeLike
Hi Jakub, thank you !
1) Yes, I didn’t do this at the time but Scott recently told me about this trick to maximize extraction. I don’t think it’s really related to percolation vs immersion, but it maximizes turbulence and therefore provides a more agressive extraction (you can have turbulence in an immersion brew).
2) I did not realize our approaches were different there, I think this is because I started with 1:16 brews earlier, and I just adjusted the final water amount and not the mid point when I went to 1:17. Right now I use anything between 1:16.5 and 1:18 depending on how well developed the roast is; I do a first test at 1:16.5 if I don’t trust the roaster too much, then if the TDS is very high and the taste is not astringent or roasty, I go up with the ratio, but I just adjust the total amount of water. I don’t think it matters too much at how much water you stop the first pour, but it’s probably better to balance the two pours to avoid any spilling and have more room for the spin. There is also potentially more bypass water going around the filter when the V60 is filled more – Ray Murakawa made a nice experiment where he blocked a V60 filter up to a certain point and poured water higher, and water bypassed around the filter. That shouldn’t be surprising, and it means there is always *some* bypass water, for me however the question is still open as to how important this flow is with respect to the flow that goes through the coffee bed, but intuitively it will be more important when the V60 is filled more. From my limited experiments, you don’t need to go above 200g at the first pour to achieve a stable slurry temperature, as long as you pour boiling water. I made an Instagram post about this relatively recently, only the bloom phase was a bit cooler than the other steps.
3) I’ve heard that too, but I never heard a satisfactory blind experiment about this. I should probably carry one myself at some point, but I’ve had fantastic Gesha with boiling water (e.g. right now :P). Sometimes the roasts are under-developed, and when that happens I use a lower ratio instead. Scott Rao doesn’t think these lower temperatures make sense, and I think Matt Perger also think they don’t make sense. I don’t know if either tried blind tasting though. There’s clearly no reason to think the coffee gets “burned” because roasting is done at much higher temperature, but the relative profiles of extracted chemical compounds should be different at different temperatures (this is why cold brew is so different).
LikeLike
Thanks, helpful!
LikeLike
Thank you very much for science-based tips and techniques! Do you make any adjustments based on the size of the V60 you’re using (eg small, medium, large). And if so, can you explain? Thanks again!
LikeLike
I never tried another size than 02, but as long as the angle is the same there won’t be a difference. If you use different doses than 22 grams though, there will be a difference. You can look up Darcy’s law: shallower coffee beds (smaller doses) will lead to a faster flow of water through the coffee, and you’ll need to grind finer to get the same TDS (concentration). With perfect execution this will amount to a higher average extraction yield, which is good if you are using very well roasted beans. However, a faster flow in the coffee bed will more easily create channeling and therefore lead to uneven extraction, lower average extraction yields and a mix of sour and astringent tastes. This is why Scott recommends 22 grams, to ensure a 5 cm deep coffee bed at the V60 angle, and slow down flow enough to minimize channeling. I found that using a filter with slightly larger pores (Hario untabbed for example) is another way to grind slightly finer without clogging and get higher extraction yields less prone to channeling.
LikeLike
Great, thanks!
LikeLike
Hi Jonathan,
Thanks for your holistic study and sharing on V60 pour-over. I am so interested to duplicate your water recipe and benchmark with the water recipe from Barista Hustle. I think there should be some difference between each other. There is one detail that I would like to confirm with you, what is the exactly additive you used? Magnesium chloride or Hydrous MgCl2? If it was Hydrous MgCl2, the mass should also be 2g, right?
LikeLike
It was hydrous MgCl2 (hexahydrous, the most common form shown on the picture), yes the 2g is for that hydrous form.
LikeLike
Hi Jonathan,
Do you know KONO Meimon dripper? (https://imgur.com/a/usvpK5F) It may be the first symmetric conical dripper in the world, designed at 1973. Actually, V60 is an imitation of KONO Meimon. I think Kono is a better dripper for Rao’s or Perger’s method, due to its shorter ribs.
When you brew with a long-ribs dripper like V60, it’s easy to see some water just go through the filter at upper part of V60 without contacting the slurry. The amount of the “escaping” water depends on several factors: the amount of fines, how long and how strong your spin is, the amount of water you pour directly on the filter, the water level and total drawdown time. Sometimes, 20 ml or 30 ml of water just go through the paper and stop extraction, and you may get a lower EY and less consistency.
But a dripper with shorter ribs like Kono can fix this problem. The short-ribs design can attach the filter to the dripper perfectly at upper part of the dripper, restrict water flow, and make sure almost all water can go through the slurry. You may get more EY and more consistency.
I am not recommending a certain brand of dripper, just think shorter ribs may be a better choice for your method.
LikeLike
Hi ym, I haven’t tried the Kono, that could be interesting. However, I don’t really buy that bypass argument intuitively. Water has a very high surface tension and it will require a lot for it to beat surface tension to go through the filter along the walls. If I can get my hand on one I could check and measure the difference. The point of the ribs is to allow air to flow up which fastens the flow of water through the coffee bed, allowing you to grind finer and reach higher EYs without astringency which I think can be the result of long drawdown times in a V60. This is why I’m also skeptical of the Kasuya V60, eliminating the bottom ribs also reduces flow and I don’t think that is good for uniformity.
LikeLike
Here are some videos about v60 bypass.
https://youtu.be/XQRndZ_W7mE?t=193 @ 3:13
https://youtu.be/AJeFX-yqEnk?t=226 @ 3:46
You can easily see the bypass water, especially when the water level is high. I am not sure what percent of water actually pass through, but it’s definitely not negligible.
LikeLike
Thanks, we see it better with Tim’s V60. Yes I agree it has to happen, but intuitively it wouldn’t be high unless you have significant clogging (I agree it will be worse with a significant column of water). I’ll try to actually measure the fraction, thanks for the brain storm.
LikeLike
Hi Jonathan, nowadays I use the Alessandro Galtieri method, in Italy when he won the competition (2 pours at center very fast + prewet) and I have ” a big extraction in short time” (20 %, 3 minutes with wilfa grinder). Do you know why this is happening? Can you comment on it if you’ve seen it or tried it? It pours very fast, this affects and raises extraction or something else? (except spin) P. S. What I changed was the temperature I had at 98 degrees and 22g of coffee 375 water . Thanks.
LikeLike
Hey Peter, I’m not familiar with this method. Maybe the “fast” part allows to create a lot of turbulence which can be good. Pouring only at the center could create channeling though, and you’ll need to be careful that you don’t have high & dry grounds that aren’t contributing to extraction. You can try the method described above on the same coffee, dial in the proper grind size that you prefer, them compare both methods side to side and see which one you prefer.
LikeLike
I do not get high and dry grounds i have flat bed. If I do not just pour in the center but do it quickly all over the surface? P. S. I have tried your method, but I do not get so much tds or extraction so quickly. However, a video would be helpful at some point. Thanks
LikeLike
Sure, a video is in my plans. You might need to grind finer to get higher TDS; as long as it tastes good and not astringent.
LikeLike
Hi Jonathan, What is the best way to turbulence? pouring at a faster rate or from a higher position and thin flow? and when pour in the center, if you pour the water quickly, it will not spreading out the pour? thanks
LikeLike
Both ways will achieve turbulence (basically you just need the fluid to go fast to get turbulence), but pouring fast from a lower height will make it much harder to (1) be precise about the volume you pour and (2) obtain a symmetrical and flat coffee bed to avoid channeling during the subsequent drawdown phase (after you stopped pouring). For these reasons, I would really recommend pouring slower from higher up, rather than pouring fast.
LikeLike
Does it affect something if we pour in circles or in some other way; Or just have to pour all the slurry in any way? thanks
LikeLike
I don’t know the effect of specific patterns, but I think it’s important to pour everywhere ~uniformly. I’m very skeptical about statements like “avoid edges at all cost” or “always pour exactly in the center”.
LikeLike
Thank you for this fantastic guide.
I did not find (or oversaw) any specification regarding if you use the 01 or 02 cone (1 cup/2—3 cups) (this goes for the wooden-handle jug as well)?
What are your observations in comparison to Chemex? Some say, chemex produces an aven lighter, fruitier coffee than V60. Right now I use an espresso machine and Aeropress, wherefore I thought that chemex would make the best contrast, wanting to enter the drip coffee world. On the other side of the argument, many people also just seem to believe Hario is simply better (flow, taste etc) than chemex, and that the flavour profiles are not that different anyway. Any thoughts? And do you use Aeropress at all?
LikeLike
I don’t think there’s a difference in extraction between the 01 and 02 sizes, because they have the same angles. I use the 02 size but you could use either. Using a dose of 22 grams however is there for a reason; it’s to get a 5 cm bed depth which helps mitigating channeling compared to shallower bed depths. Deeper beds will be harder to bloom properly and agitate throughout the brew, but otherwise they should work well too. Scott Rao says that for doses much larger than 22 grams it’s easier to go with flat beds, but I have no experience with that; my intuition is that they allow you to agitate a larger fraction of the slurry more easily.
The brew container that you use has no effect on extraction, only on thermal insulation. Personnaly I don’t care if my coffee quickly cools down to below 180F, because I enjoy good coffee better at that cooler temperature, so a glass carafe is fine by me.
As for the chemex; I should probably try to verify that taste claim with blind tasting, but I’m a bit skeptical about it. The main differences of the chemex are:
(1) It’s made of glass so your slurry temperature will be much lower (about 185F if you use 212F water and preheated the Chemex thoroughly; if you don’t preheat the Chemex it would probably be about 175-180F). Lower temperatures will extract different flavor profiles, in my subjective experience less sweet and with less bright acidity. Matt Perger thinks lower temps can mitigate roasty flavors though, so that’s a potential benefit if you have a dark roast.
(2) The filters are extremely thick and unbleached. In my experience it’s very hard to rinse them enough to remove the cardboard taste they impart on the brew. If you did however, the thicker filters may be absorbing more coffee oil, potentially producing a brighter taste (but I’m not convinced V60 filters don’t already absorb most of it such that there would be no difference).
(3) The filter tends to stick to the walls, leaving only the spout where air can escape and therefore potentially slowing down the drawdown. This would force you to grind coarser and lower your average extraction yield. Some people use chopsticks between the filter and glass wall to fix this.
(4) I’ll need to check this but I think the angle is wider than 60 deg, which would mean you should use more than 22g of coffee to get a 5 cm bed depth, and make it a bit harder to avoid high & dry grounds.
I use aeropress sometimes, but rarely. It lets more undissolved solids in the cup, which creates a darker-colored and more full-bodied cup; I tend to prefer the taste profile of V60. I think the reason for that difference is two-fold: aeropress (and Aesir) filters have larger pores; and most recipes agitate the coffee bed then immediately start drawdown, preventing a full filtration of undissolved solids by a settled coffee bed. Even with the same filters and if you waited for the coffee bed to settle in order to get no undissolved solids, the taste profile would still be different because aeropress is an immersion rather than percolation; and from arguments of chemistry and physics, I think that immersions will amplify the taste of chemical compounds that are present in small quantity in the coffee bean, whereas percolation will translate each chemical compound in a fraction closer to their quantity fraction in the coffee bean (except for their different solubilities).
LikeLike
I just checked and the Chemex does have a slightly wider angle, probably just a few degrees.
LikeLike
Thanks! That is very helpful! Does this mean that you dose 22 grams no matter what, i.e. never brew less, and if brewing more, do several batches, as to remain the depth of the coffee bed?
LikeLike
No problem ! I try to stay at 22.0 grams always with this recipe. I think you could go slightly above (maybe ~23-24 grams) without too many issues, but the higher your coffee bed is, the slower your drawdown will be. So if it becomes too high, you will end up needing to grind coarser, which I think is a cause for more uneven extraction by itself. It will also become harder to pre-wet all the coffee bed toward the bottom when you bloom, and to get good agitation with the subsequent pours. If your dose is smaller, you will become more susceptible to channeling, which might again force you to grind coarser if you don’t want an astringent brew.
LikeLike
Since I am about to go all-in in the pour-over coffee world, making some purchases I take the liberty to ask a few more questions, since I decided to take your recipe as a starting point. If I have missed some information you already wrote about, I am sorry if I missed it.
• Do you have the 01 or 02 size of the Hario server? I reckon, with the recipe, the 01 would be sufficient, and lead to less temperature loss (if that is something you want?), but are there other aspects to it, is aeration good? Will mostly only brew for 1–2 persons.
•As James Hoffmann sorted out,¹ there are three bleached Hario filter varieties out there: Japan₁ (the “original”, sold in 40-packs in a box) Japan₂ (sold in 100s in a larger plastic pouc) and a Dutch (shrink-wrapped 100s) (and allegedly also some bird-shaped one).² Upon which is your recipe based?
• I will need a separate grinder for pour-over, and am thinking about Comandante. Do you have anything good or bad to say about this, or other entry level grinders? I have thought of Baratza, Sette etc, but will probably—but not definitely—go for handgrinder. If you don’t want to review grinders publicly, I can ask again at Patreon, where I will soon join the Honey Geisha, when I am back from a trip.
Thanks again in advance,
J
PS. The grind-size particle analyzator is amazing!
References
¹ https://www.youtube.com/watch?v=0uggibTY0AE
² The Japan₁ is sold in
LikeLike
Thank you for your comment ! I have the size01 Hario server – the glass olive wood one. I prefer it to the heat sealed one because I like that it cools down a bit faster (I tend to finish my coffee within 30 min) and I routinely burn myself with the thermos type one lol. I honestly ordered it for its looks, but I’m extremely happy with it. I find the olive wood lid cover not that useful, but the handle is still awesome. It’s also super easy to clean it up with a drop of soap, hot water and a bottle brush. I don’t think size02 server is useful for 1-2 people. It holds up to 400 mL and I never needed more – a Hario V60 with larger batches would not be useful unless you find a way to make good 1:20+ ratios or use larger than 22g doses (more danger for uneven extraction and clogging). Even with the EG1+SSP burrs and the highest extracting coffee I ever had, I didn’t want to go above 1:18 in a pour over.
Filter types: yes, I call the Japan1 “tabless” and Japan2 “tabbed”. I use the tabless filters which are harder to find because they are less susceptible to clogging (pores are slightly more uniform and there are more of them- this is a future blog post). However I also just did an experiment of tabbed vs tabless the other day and found no difference in any variable; I strongly suspect that with very low fines grinders they stop making a difference. But with any conical (i.e. all hand grinders) or smaller burrs (like Baratza Forté) you’ll get higher EYs and less clogging with the tabless because they will allow you to grind a tad finer. This is good if you have a good technique to mitigate channeling.
I had the Lido3 and was happy with it, but everyone since told me the Comandante was better. I never had a chance to try it. I also have a friend that loves his Kinu M47 and he made me a couple great V60s with it but I don’t know how it compares to Comandante. The build and design of the Kinu is beautiful. If I had to buy another hand grinder it would most probably be the Comandante.
If you go with automated grinder, I think it’s worth spending for the Baratza Forté BP (steel burrs). I had one and was amazed by what it can do for filter. I would not ever have upgraded it were it not for the EG1, but it’s an insane price bump. Forté is *not* practical for travel, but I’m concinced flat burrs are better for pour over if you manage channeling well, because you’ll have less fines, be able to grind finer and up the EY which will bring more desirable flavor complexity assuming your coffee is well roastes. Some Comandante users will crucify me from saying this; I’m sure it’s a great grinder, but since experimenting with flat burrs with fewer fines (and SSP+EG1 has so little fines only industrial roller mills can top it; I was actually afraid this might be bad for filter because I was the first person I know of to venture in that extreme a low-fines scenario), I am now convinced that fewer fines is more desirable. You just need to know how to mitigate channeling. Otherwise you won’t be able to grind fine enough to get the full potential and you’ll end up with a more watery cup (and lower EY) than conical burrs. I would not be surprised if Kasuya’s method tasted better with conicals, but (trying to get even more heat here) I think his method is based on pseudo science and produces a much less even extraction overall (I’m also of the opinion that it forces you to grind coarser, which is the wrong direction).
Make sure to look at my pour over video too, that might help. I do a 45 sec bloom now which Scott Rao recommended and I think it helps.
LikeLike
PS I’m ok with public product recommendations, I’m not endorsed by any company. Fedele offered be a refractometer and Weber got me a rebate on the EG1 (after I decided to buy it), that’s it. I don’t think this affects my perception of their products. I’m honestly most frustrated with the V60 dripper right now lol. It’s great and simple, but I can’t believe there isn’t a better plastic symmetrical steep & release dripper out there. Or a good, not 5K$ automated dripper with a decent shower head I had a chance to try the Hario Smart 7 in-store, I think it has potential but I’m not sold on their showerhead and software, it’s very hard to judge from a single in-store brew, and it’s still pretty damn expensive.
LikeLike
When you say the “heat sealed”, which one do you mean, not the insulated for sure, since you say you burned yourself?¹ All servers do have heat resistant glass I believe? Or do you mean the rubber seal of the beehive server with glass handle?² I was opting for this latter one actually, for aestethics, but if you think the seal is to heat insulating, one could just leave it off or use it without the rubber I guess. Or the 02 anyway to get more cooling air in. Hm, so many options …³
I see your frustration regarding the V60. It is strange, isn’t it—it’s the simplest of principles (at first look), but at the same time so many variables. And most innovations seem fo focus on tiny details (but never the right ones?). Why are they So far from variation or quick change? // Why with the time do I not glance aside // To new-found methods and to compounds strange? 🙂
Many greetings and thanks from Germany!
¹ https://www.hario.co.uk/collections/coffee-brew-servers/products/heat-resistant-server-2-cup-black
² https://www.hario.co.uk/collections/coffee-brew-servers/products/hario-v60-range-server-clear-360ml
³ https://www.hario.co.uk/collections/coffee-brew-servers
LikeLike
Yes I meant the heat sealed one. It looks like brass metal with a screwable top, and I always forget how it keeps the beverage hot that’s why I burn myself with it lol.
LikeLike
Wow very fantastic guide. I don’t know that Rao already change his own method. Thanks for the information.
But, here is the question, do you agree that every single origin coffee, need their own recipes? Or is one-method(technique)-to-fit-all really does exist?
And, If someone give you a new coffee that you never brew or tasted before, could you please tell me steps by steps tips to fix the recipe?
Thanks alot!
LikeLike
Thanks ! The general method is good for any kind of beans IMO. It is just a way to prevent channeling, extract uniformly and filter out insolubles (the 22g dose is what we think is the optimal one to reach these goals in a Hario 02-size V60). The only parameters to vary would be: grind size, water/coffee ratio, *maybe* water temperature, and *maybe* water composition. Only convincing argument I heard about water temperature was to mitigate roasty/bitter flavors. In my experiencr every other claim of using lower temp resulted in a worse cup. Water composition is not well understood enough at this point for us to fine-tune them with origin etc. Grind size is most important for the physics of bean shattering; decaf or darker roasts or more aged (i.e. drier) beans shatter more and thus require a slightly coarser grind size. Other than that, the only parameter I really want to change w/r/t roast and origin is the average extraction yield. The optimal EY depends on your grinder, but also on your beans. The way I modify EY is not by adjusting grind size, because using a grind size as fine as you can without triggering channeling allows a more uniform extraction; hence my lever for controlling EY is the water/coffee dose. This is what I change the most often. You need to know your grinder however to get a good starting point; with the Forté my starting point was 1:16.5 and I adjusted with taste for susbequent brews, with the EG1+SSP burrs I start at 1:17.
LikeLike
Hey, i just follow your tips to change my water/coffee (ratio) , and surprisingly its REALLY changing my taste of coffee (my best ratio right now is 1:17,7). I used to changing my method, grind size, etc. And it’s really confusing with my limited equipment.
I really appreciate your hospitality, please continue that kindness of your soul, cause i think hospitality is one of the important thing for barista or coffee expert.
Thank you, and good luck jo!
LikeLike
Ah, nice to hear 🙂 thank you
LikeLike
An incredible post once again. As the reader, I could easily feel the passion and the scientific background behind this post. I really like your approach to the science and culture of coffee. I also believe that this area worths having attention as wine or other drinks have. However, the sector doesn’t have enough people with your approach. Even most of the baristas are not aware why they pour in that way. They just brew how they are told or how they see on the web -without questioning and learning the very basics of the brewing mechanism.
I hope that your passion will last forever and you will share these kind of deeper insights with us.
Keep in contact,
@oncekahvem
LikeLiked by 1 person
Thank you !
LikeLike
Hi! I’ve been convinced by your science to finally try my hand at using a V60, and I must say that Scott Rao’s and your method for brewing really turned up my coffee game!
I wanna ask though; since you always say that you use 22g of coffee per brew and use a 1:16 to 1:17 ratio, does that mean that your usual daily serving of coffee is around 352 to 374g ? Reason why I’m asking is because my mug only holds 265g, and that’s what I consider a ‘single cup of coffee’. I wanted to confirm this with you so the process of brewing would be similar to yours (to achieve the 5cm coffee bed).
Thanks!
LikeLike
Thank you ! Yeah it makes about 320g of coffee at 1:17 (because the coffee bed retains some water, approx. twice the dose), and that’s too much for most mugs. I brew in a serving pot, Hario makes some, and then I pour the coffee in a espresso-size double-wall glass mag. No idea why but I like drinking in small cups.
LikeLike
Hey!
Thanks for a great and thorough article! I’ve got a comment regarding grinding frozen beans: Matt Perger (for instance, here https://baristahustle.com/blog/the-grinder-paper-explained/) suggests that it’s beneficial to grind coffee right after the freezer. It seems that freezing shifts both the mode and the median of the PSD curve to the left, rather than excessively producing the superfine fines that clog filters etc. Consequently, the total spread of particle sizes becomes narrower – which is definitely a benefit because the surface of larger particles extracts at roughly the same pace as the fines (so reducing the number of fines would cause a drop in extraction, while reducing the number of “boulders” improves extraction). So shattering doesn’t seem problematic – or does it?
LikeLike
Hey ! Thanks for your comment. Yeah I know about this paper; unfortunately I don’t think it provides any useful information for filter coffee. The authors centered their study around espresso, so they ground all of their samples at 2.7 on a Mahlkonig EK dial (filter would be in the range 5-8). This produces no coffee particles larger than 100 micron, whereas in filter coffee the bulk of particles are in the range 100-1000 microns, plus some amount of fines near ~10 microns that depend on grinder and burrs etc.
The idea behind the paper seems sound; based on my experience, there are typically two bumps in a particle distributiom, a main bump caused by cutting/crushing of particles, typically peaked at a size slightly smaller than burr spacing (a lot smaller it RPM is high), and a peak of fines caused by the shattering of beans (those can’t be seen with my app by the way, unless you use a microscope which I haven’t tested). Basically, make anything colder and it will be more susceptible to shatter (an often used example is to dip a rose in liquid nitrogen and drop it, it will shatter in pieces) – this also applies to coffee, unsurprisingly. What we should therefore expect if we grind colder is that the peak of coffee fines will become higher, and the peak of crushed particles will become a bit lower. I do not know whether either peak will narrow or move around, and I don’t think the paper tells us if they do, because they ground so fine that these two peaks are almost superimposed. By increasing the amount of fines, they had a narrower general distribution (the sum of both peaks is narrower), but that doesn’t really tell us what happened to the two individual peaks; my intuition is that increasing the height of the fines peak and decreasing the height of the crushed particles is itself responsible for the narrower combined distribution.
My intuition of how the physics work makes me think that results would be worse for filter when grinding cold, because having too many fines is not desirable for filter in my opinion; it slows down flow, makes you susceptible to clogging and therefore channeling and astringency. Maybe my intuition is wrong, but we have no data currently for filter coffee. I could eventually investigate how the peak of crushed particles evolves vs temperature, but as I mentioned I won’t see the fines with my app.
LikeLiked by 1 person
You use a cork lid for keeping the heat in the V60. You ever tested cling foil for covering the V60?
LikeLike
Hi mate. Fantastic article. This level of detail and thoroughness is rare to find.
Just one question re water. I made the suggested mineral concentrate and it precipitated as you pointed out would occur. However, it seems the precipitate remains even when the concentrate is added to distilled water (I can see turbidity when held up to the light). Is this normal? Cheers, Nigel
LikeLike
Hi Nigel, thank you ! I’ve had this happen to a couple persons now, and my best working hypothesis is that one of the ingredients you bought is contaminated with something that’s hard to dissolve. For pour over it probably won’t have any effect, except that your weight for that particular ingredient might be a tiny bit off (because you are also weighing the contaminant). If your ingredients are food-grade, some contamination is allowed as long as the contaminants are not harmful for consumption. If you would like to figure out which one may be contaminated, you could repeat the steps with only one ingredient per concentrate, then dilute them in some distilled water at the same ratio, and see which of the final products precipitates. My suspicion would be that either KHCO3, MgSO4 or MgCl2 may be the culprits. If you want to make sure your contaminants did not introduce large errors on your KH and GH (they probably didn’t), you can buy aquarium titration tests for total alkalinity and total hardness and test out your brew water. You can gain more precision with these tests by using larger samples of water – using twice as much water will require twice as many titration drops, i.e. it will improve your resolution by a factor 2.
LikeLike
I have a real stupid question…
On your graph comparing distribution between Lido and EK43, you say Lido make a lot more fines but then on the bar for the finest size detected, EK’s bar is a lot taller than Lido (in general as well , more grounds used?)
Mind ELI5 to me? Thanks!
Also thanks for making the graph readable, instead of having 10 curves with similar colours on one pic! (Colour-weak, can’t ever read socractic coffee posts)
LikeLike
Hey ! That’s not a stupid question at all. The two distributions are scaled vertically to have the same maximum bar, and the Lido just happens to have one bar near 0.4 mm that is super high from random fluctuations (these histogram bars are not perfectly accurate because of the finite number of particles). What you should pay attention to instead of the peak is the general shape of the distributions. Lido 3 has a very wide and flat distribution (plus this one outlier peak), whereas the Mahlkonig distribution has a narrower overall distribution.
LikeLike
Hey Jonathan,
You’re soooo deep into the rabbit hole and I can’t help but thanking Coffee God for that.
I have a question I’ve been thinking about. Do you think the cone-shaped design of V60 cause uneven extraction simply because the ground at the bottom will have more water passing through it then the ground on top?
Cheers!
LikeLike
Hey, no on the contrary I think it’s better than a cylinder because it partly compensates for the bottom grounds always encountering more concentrated water, which is a less potent solvent.
LikeLike
What’s the benefit of waiting for the coffee bed to almost appear before starting three 2nd pour? Is this still your recipe aside from switching to 210 water with a flow restrictor? Thx!
LikeLike
I’m not sure yet what the best approach is for that specific part. I suspect it doesn’t change a lot, but waiting more means that (1) you lose more temperature, but this will be quickly made up for at the start of second pour, and (2) you possibly gain a bit of extraction cause you’re resetting the slurry to less concentrated water for the second pour. You’re also making the brew a bit longer, therefore increasing extraction yield. Maybe this coud require a slight change in dial in. Another aspect is that the last part of the first pour’s drawdown with a shallower water column will flow more slowly and therefore less uniformly across the coffee bed, so waiting less *could* make extraction more even. This is one reason why I want to try Hoffman’s continuous pour method eventually, as it would eliminate this moment of slow flow.
LikeLike
I lost it at “If you are brewing a very dark roast, it will form a large dome of hell that will summon Ihsahn, who will ensure that your coffee tastes like the devil.”
Really enjoyed this post (even though it’s older). Have you changed any part of your method since then?
LikeLike