
[Edit October 14, 2019: After having used the method described below for about a month, I decided to add a few steps to ensure that no liquid gets caught inside the pipette’s rubber cap. If you want to jump straight to the modifications, just use ctrl+F and search for October 14.]
Lately I have been a bit unsatisfied with how repeatable my measurements of total dissolved solids (TDS) concentration were with the VST refractometer. The instrument itself has a quoted precision of 0.01% TDS, but I found that the only way I could achieve such repeatability was to brew a few coffees in a row, let them thaw for about 40 minutes, then sample them carefully and measure them many times, as I did in one of my latest posts to assess my manual repeatability in brewing V60s. Lacking a good methodology to reach 0.01% TDS repeatability on every morning brew has held me back from properly characterizing the effects of V60 filters, grind temperature and a few other things.
There are two problems that will hold you back from measuring TDS with a 0.01% precision: evaporation and a sample not at room temperature. Today I want to present you with a method that I recently designed through trial and (lots of) error, which allowed me to reach that 0.01% TDS precision I was hoping for. I will just start with the answer first, and describe what method worked for me, but I’ll include more data to back up why it works, and some other things I tried for the more curious readers.
This method is intended for filter coffee, therefore it does not include the use of syringe filters. For that I would recommend using Mitch Hale’s guide on refractometer usage, but it would probably be wise to add a step where you cool down your sample with a larger, thermally conductive pipette (I’ll talk more about the details below). A larger pipette would be needed, because the syringe filter and plastic syringe both need to be “rinsed” with some coffee first to get a good measurement.
Required Equipment
The equipment you will need is the following:
- A set of glass pipettes. You will need only one pipette but two of the red rubber caps that come with them. Metal pipettes would also work but they are very hard to find.
- Two small elastics
- A spoon
- Access to a tap water faucet and a dry towel near your brew station.
- A refractometer.
- Distilled water.
- Rubbing alcohol.
- Two eye dropper bottles (facultative)
- Small microfiber cloths for refractometer cleanup (facultative). You can also use tissues.
Preparing the Equipment
Place the two elastics around the pipette as shown below; you can leave them there between uses:
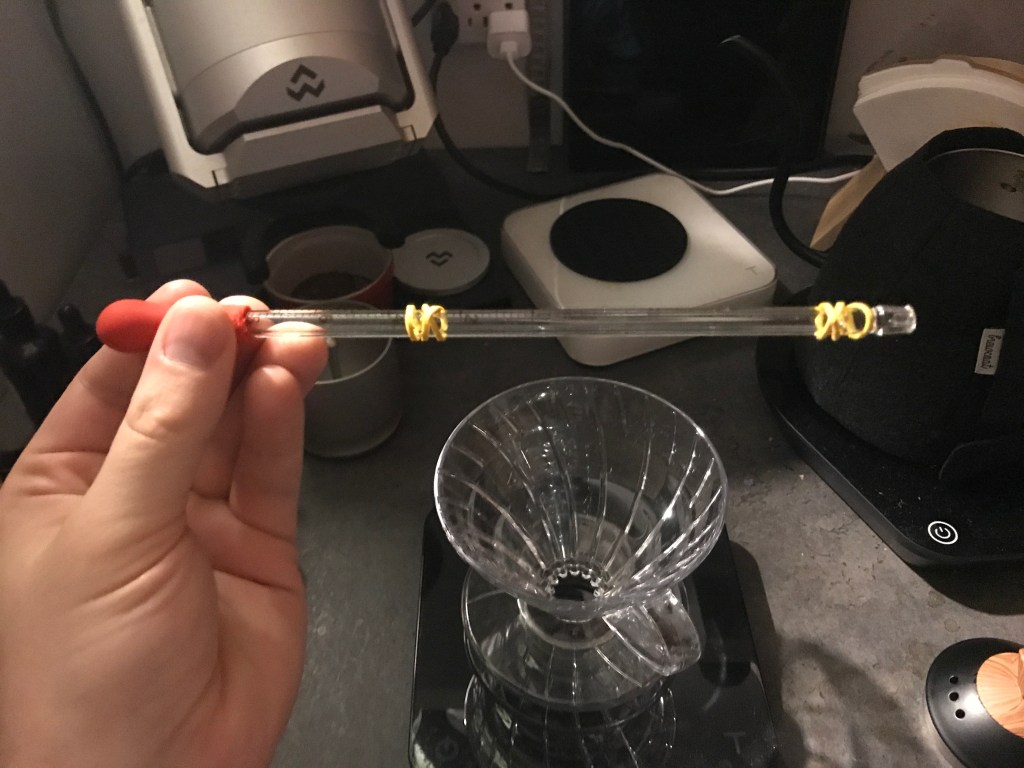
Note that the elastic close to the outer end of the pipette is not exactly at the tip, so that you can avoid dipping the elastic in your coffee. Both elastics serve to prevent water from sticking to the bottom of the pipette surface during rinsing and travel all the way to either end of the pipette. You may also notice that I mounted the rubber cap on the “wrong” end of the pipette. I actually prefer it this way because the larger opening on this end creates less froth when putting a sample of coffee on the refractometer lens.
The Detailed Steps
(1) Put distilled water on the lens
- Use a generous amount of distilled water to make sure the lens is at room temperature.
- I recommend using an eye dropper bottle to keep a small amount of distilled water handy.
- Ideally wait a minute or more so that the temperature of the lens is at equilibrium with the distilled water; I do this step before I start brewing to save time.
- Close the lid to avoid contamination.
- You can blow gently on the surface of the distilled water if you don’t have time to wait a few minutes.

(2) Sample your coffee with the glass pipette.
- Don’t plunge the elastic in.
- Stir thoroughly with a spoon as you’re sampling (I don’t think swirling creates enough vertical mixing).
- Season the pipette by sampling, dropping back in the coffee pot (or elsewhere) then sampling again.
[Edit October 14, 2019: At this step I highly recommend wiping the tip of the pipette dry with a clean, dry cloth. I also recommend you verify the loose rubber cap inside is dry by pressing it against your wrist or finger, while blocking most of the spout. If there’s water or coffee in it, you should feel or hear it hissing, and in this case you should rinse it and place a dry tissue inside it for a few hours. I keep a couple spare rubber caps around in case that happens.]
(3) Rinse the pipette for 30 seconds.
- First put a rubber cap on the pipette spout to avoid diluting your sample.
- Open a gentle stream of cool tap water. Use the photo further below as a reference.
- Hold the pipette by the two rubber caps, with the spout end a little bit higher.
- Place the pipette close to the top of the water stream to avoid any water getting on either end.
- Gently move left and right and rotate the pipette.
- Do not rinse for longer than 30 seconds or you might make your sample too cold.


(4) Dry the pipette thoroughly with a towel.
(5) Leave the pipette to rest for at least a minute, ideally for 2-5 minutes.
- Waiting allows the sample to reach room temperature even if the tap water made it a bit too cool.
- I usually take this time to taste the coffee and note down my impressions without being influenced by the measured TDS, and then to zero the refractometer.
(6) Zero the refractometer.
- You can optionally measure the distilled water temperature with a bead K-type thermoprobe right *after* zeroing if you want to test how well you are applying the method.
- Do not rezero after putting the probe in because you might have contaminated the distilled water. Dry the probe thoroughly.
- I do not know whether the VST refractometer keeps its zero when it automatically shuts down.
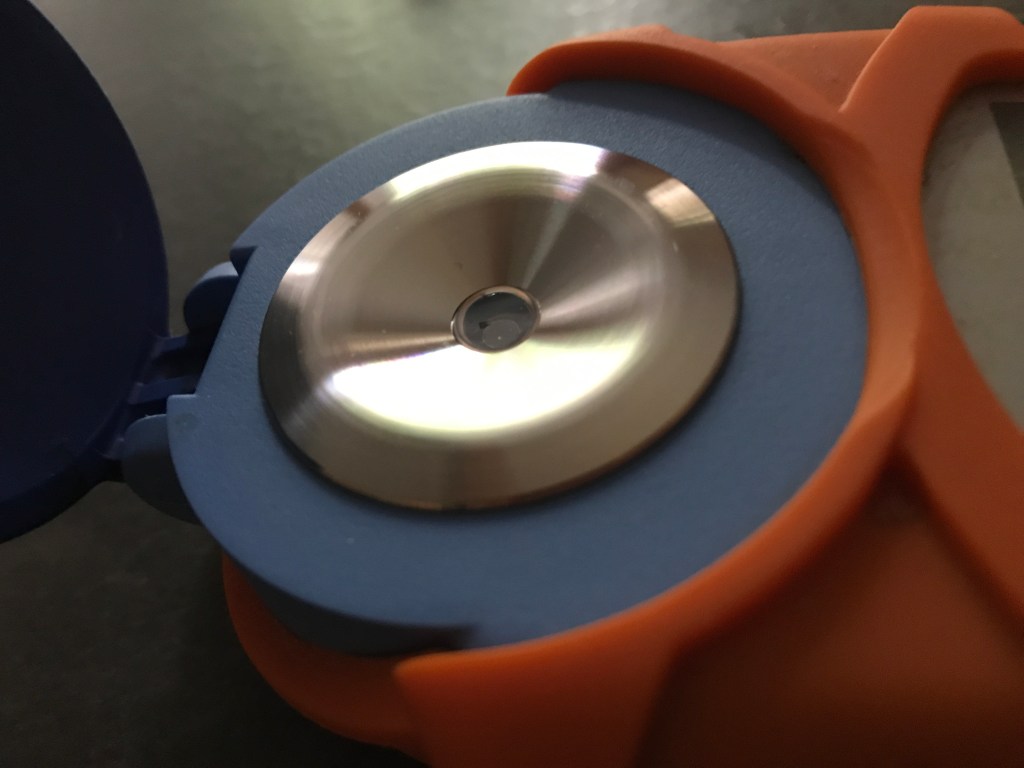
(7) Dry the refractometer lens.
- You can very gently blow on the cleaned surface to favor evaporation.
- You can look at an angle to see light reflecting on the lens; this makes it easier to see if any water droplets remain (see the photo below).
- Use a clean and ideally absorbing cloth. A tissue can work. Be careful not to scratch the lens if you’re using Atago; VST has a sapphire lens so you won’t scratch that with conventional stuff.
- I use cloths and keep one for water or alcohol only, then I dry it between uses. I use a different one (or a tissue if I’m out of them) for wiping out coffee.

(8) Place 3-5 drops of cooled coffee on the lens and immediately close the lid.
- I recommend discarding 1-2 drops before putting a sample on the lens. This will help ensure that your sample is not contaminated with tap water.
- I recommend placing the drops around the lens on the metal ring, to stabilize temperature as much as possible before the sample touches the lens.
- Scott Rao recommends 3 drops only to avoid shifting the lens temperature too much, but here we already cooled down the sample so it is not as crucial. I still recommend using as little drops as you can as long as you obtain a small pooling of the sample on the lens, but in my experience up to 5 drops can be needed because cool liquid is more viscous than warm liquid.
- Evaporation is not an issue because the sample is cool; it happens extremely slowly in the absence of airflow.
- Do not blow air on the coffee sample.
(9) Wait at least 30 seconds and not more than 5 minutes.
- Don’t wait any longer because sedimentation or evaporation *could* become issues.
(10) Measure your TDS.
- Take several measurements. It is possible that your TDS will slowly go up if your sample is too warm, or down if it’s too cold. Ideally it shouldn’t shift by more than 0.03% TDS with this method.
- If your readings shift by more than ~0.03% TDS there is a risk that the lens temperature converged to a higher temperature than what you zeroed it at (causing a lower TDS reading), and if your sample was too warm there is a risk of evaporation (causing a higher TDS reading).
- If you want to verify that your sample temperature is the same as your distilled water when you zeroed, do this right after measuring a converged TDS with a bead K-type thermoprobe. Clean it with a drop of alcohol after doing so.
(11) Clean up the equipment.
- Wipe out the coffee sample; I use a clean cloth for this and put it in the laundry after 1 use, otherwise it can accumulate coffee oils. Tissues can work for this.
- Add a few drops of alcohol then wipe again.
- Clean up the pipettes by sampling hot water and leaving them to dry; you can also occasionally sample alcohol to do a deeper clean.
- Keep the refractometer lid closed to avoid having anything contaminate the lens.
If you put hot coffee on the lens, I recommend cleaning it up and then putting as much distilled water as in the photo further above for a minute, wipe it and repeat this three times. This will allow the lens to reach back room temperature again. Once you have done this, you can start over (and don’t skip the re-zero step).
[Edit October 14, 2019: I recommend leaving the loose rubber cap downward so that any liquid inside of it would slowly drip out over time. I usually place it leaning against the wall to do this.]
The Effect of Temperature on TDS Measurements
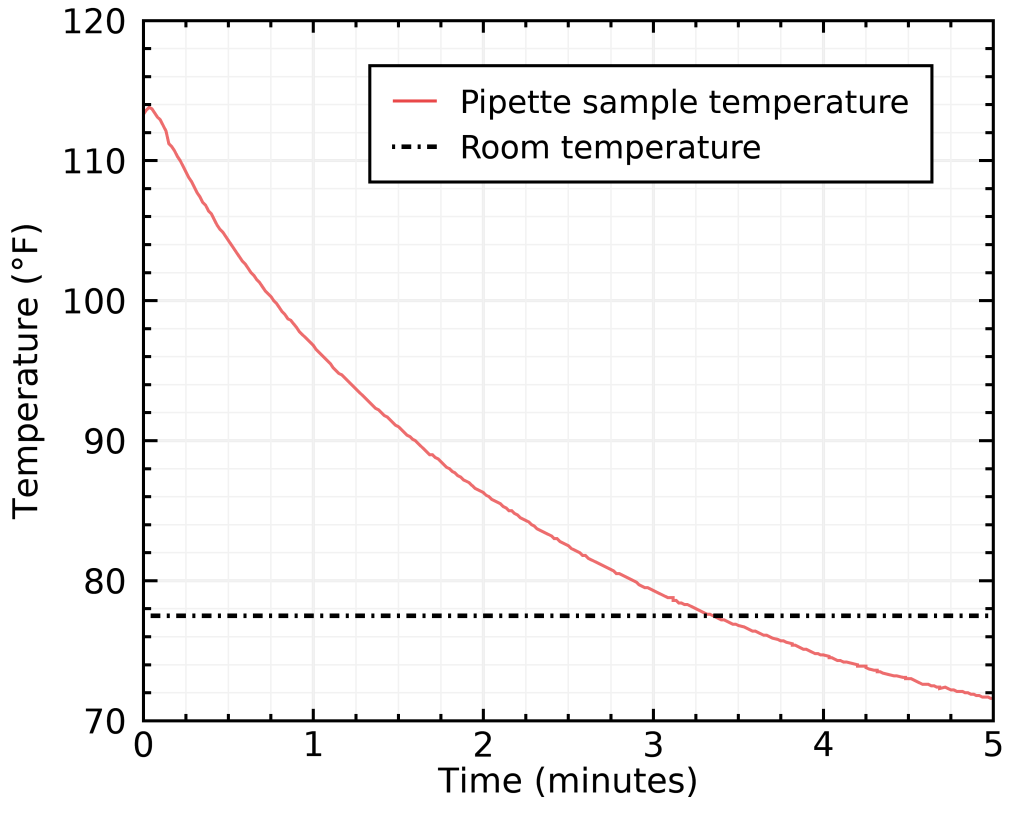
At this point you may be asking: “Ok, but how important is it really to have the right sample temperature ?” The answer is: REALLY important ! To illustrate this, I purposely put a warm sample on my refractometer lens and measured its TDS several times as it cooled down.

The room temperature was 75.7°F, and that was also the temperature of the distilled water I used to zero the refractometer. The correct TDS for this beverage was 1.45%; as soon as the sample temperature departed by 0.2°F or more, you can see differences of 0.01% TDS or more ! Only a small 5°F difference can cause you to underestimate your concentration by as much as 0.08% TDS ! The take away for me is that I should try to always measure my sample within 0.2°F of the temperature at which I zeroed the refractometer with distilled water, otherwise my accuracy will be worse than 0.01% TDS.
The Effect of Evaporation on TDS Measurements
To investigate the impact of evaporation on our TDS measurements, I tried two different case scenarios that resemble what I usually did when I cooled a sample of coffee with a ceramic ramekin. I put a small sample of water at 160°F on a milligram-precision scale and noted how fast the weight went down as water evaporated. In the first case, I placed 10.210g of water in the small plastic container that comes with the scale. In the second case, I placed a smaller 4.211g sample in a tiny stainless steel cup with a similar opening surface that I found in my plumbing stuff; in the second scenario, the sample will cool down much faster because it has less mass and is less insulated, so that will show us the effect of how fast the sample temperature drops on its rate of evaporation Here’s what I found:

It seems like the different cooling rates drastically affected the evaporation rate. The smaller sample placed in the metal cup, which cooled much faster, suffered much less evaporation. On top of that, the evaporation rates of both samples kind of leveled off as they were cooling.
But the more interesting question is how that would affect our TDS readings. If we simulate a 5 grams sample that we would be putting apart for cooling down, here’s how TDS would creep up with time with these two evaporation rates:

We can see that in the slower cool down case, TDS went up by a bit more than 0.01%, which is not great. Therefore, we want a strategy that allows us to quickly cool down a sample, ideally in an enclosed container with very little surface exposed to the air. This is why I think a pipette is a great place to cool down our sample !
Some More Data to Back up this Method
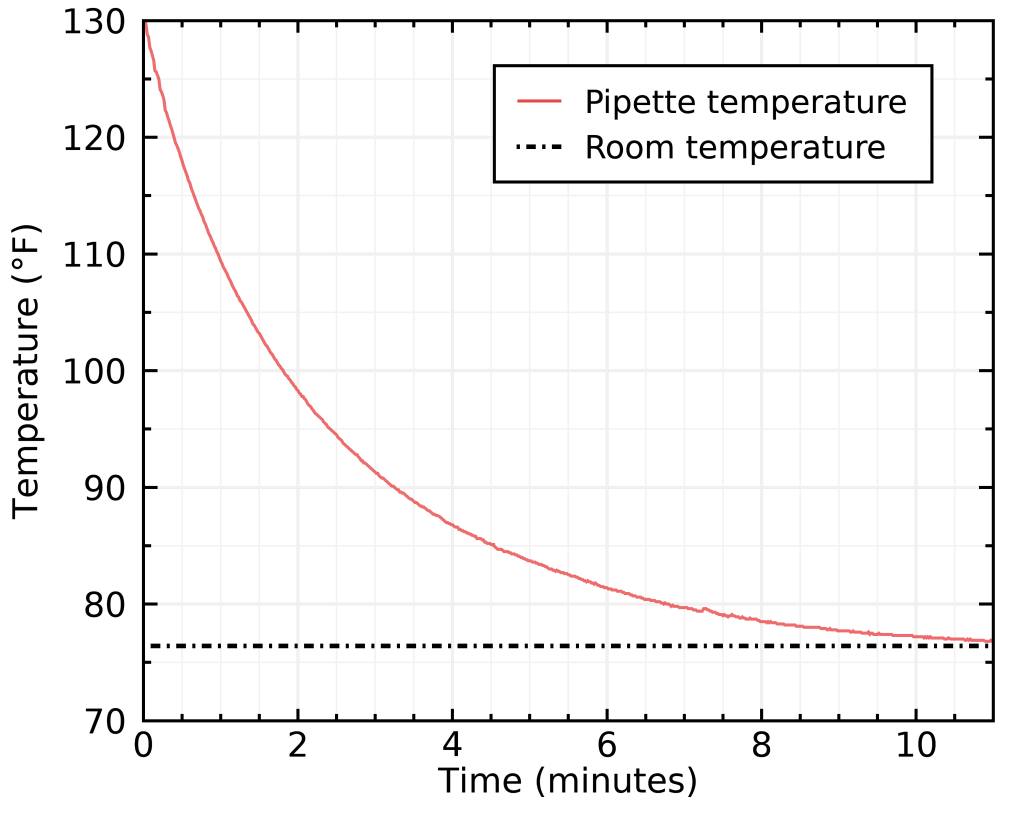
To verify how efficient this method is, I brought some tap water to 160°F, typical of my warmest coffee temperatures immediately after brewing (I use a Hario glass server; although mine is smaller with a 400 mL capacity), sampled it with a glass pipette while imitating the seasoning step, and stuck my Bluetooth K-type bead thermoprobe in the pipette then rinsed it with tap water. Here’s what I obtained:
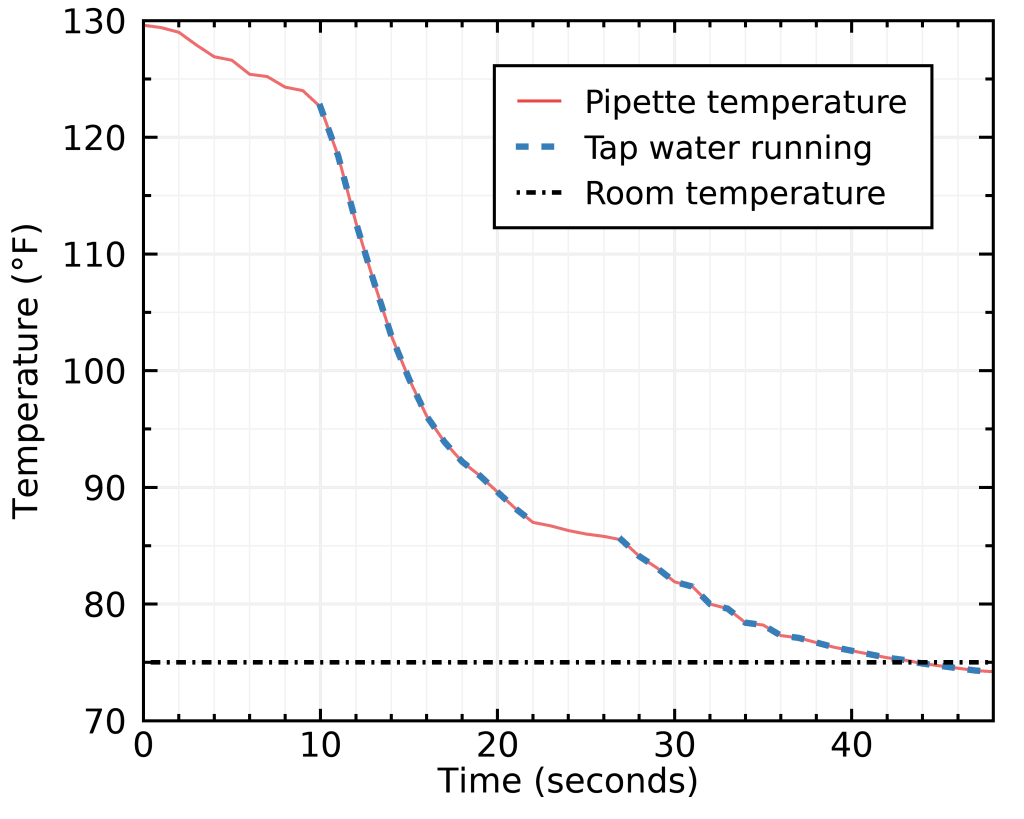
I highlighted the moments where tap water was touching the pipette; as you can see I got distracted and missed it for about two seconds in the middle. Removing that small gap, I needed exactly 29 seconds to reach room temperature.
What’s also neat about this is that the result is not too sensitive on starting temperature, because the sample cools faster the larger the temperature difference is (that’s basic thermodynamics).
Let’s compare that with my previous method, where I left my sample cool in a ceramic ramekin:
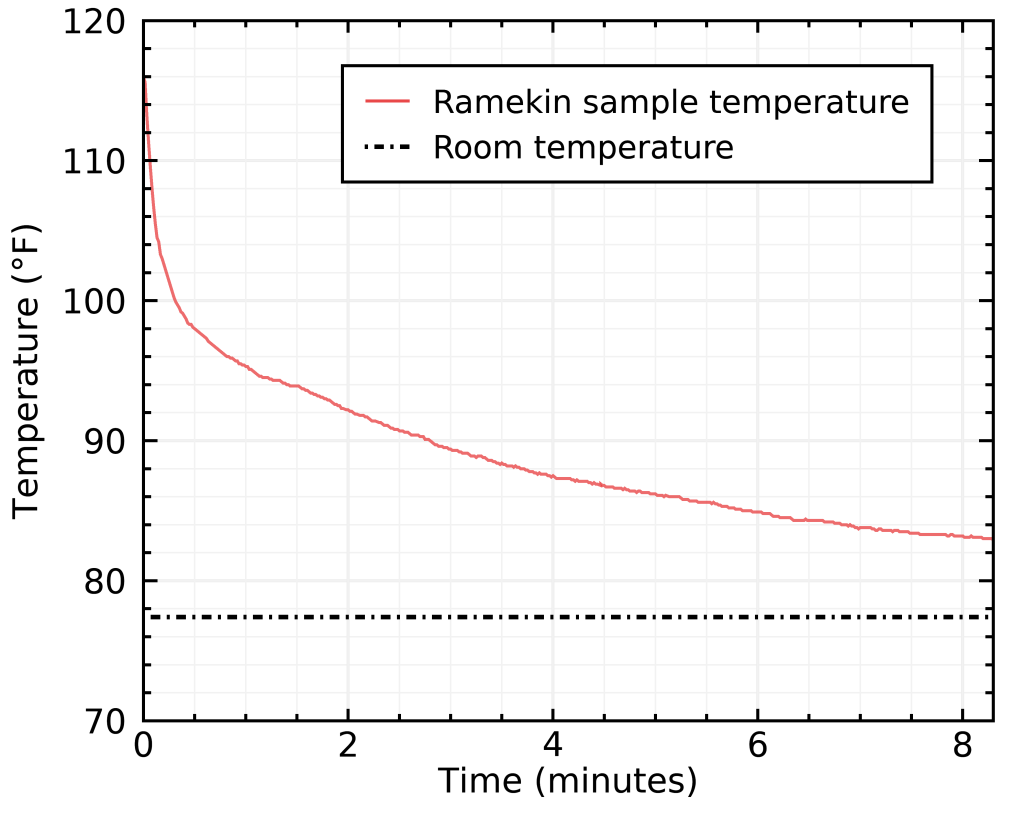
Not only the ramekin causes evaporation, but it didn’t even get close to room temperature even after 8 minutes !
For a few days now I have been measuring the temperature of my distilled water sample immediately after I zeroed, and that of the coffee sample immediately after I measure TDS, to ensure that the method above allowed to reach similar temperatures. Here are the results I obtained:
- Brew 1: zeroed at 72.5°F, measured at 72.6°F.
- Brew 2: zeroed at 76.3°F, measured at 76.6°F.
- Brew 3: zeroed at 75.6°F, measured at 75.5°F.
- Brew 4: zeroed at 74.4°F, measured at 74.2°F.
- Brew 5: zeroed at 75.1°F, measured at 75.1°F.
- Brew 6: zeroed at 75.5°F, measured at 75.5°F.
- Brew 7: zeroed at 74.9°F, measured at 75.2°F.
- Brew 8: zeroed at 74.3°F, measured at 74.2°F.
As you can see, the method worked quite well ! Despite my morning zombiness, I had an average difference of 0.14°F and a maximum difference of 0.3°F, which is just enough to affect TDS by 0.01% !
Failed Attempts and Other Methods
As I mentioned above, there are a few more things I tried that kind of failed, or weren’t really useful.
Metal Pipettes
I initially wanted to use a metal pipette rather than one made of glass because metal is more thermally conductive. I totally failed to find any metal pipettes that are not crazily expensive, so I changed my focus and looked into metal syringes and turkey basters instead. So, I went ahead and ordered the following horror on Amazon:

It did kind of work, but made a huge mess especially because the piston is gigantic; you could probably syringe up half a V60 brew with it. Having such little liquid in a potentially large encasing worried me that evaporation could be an issue, but the even more annoying part is that the piston doesn’t hold coffee very well if you release it, so you get a lot of spillage.
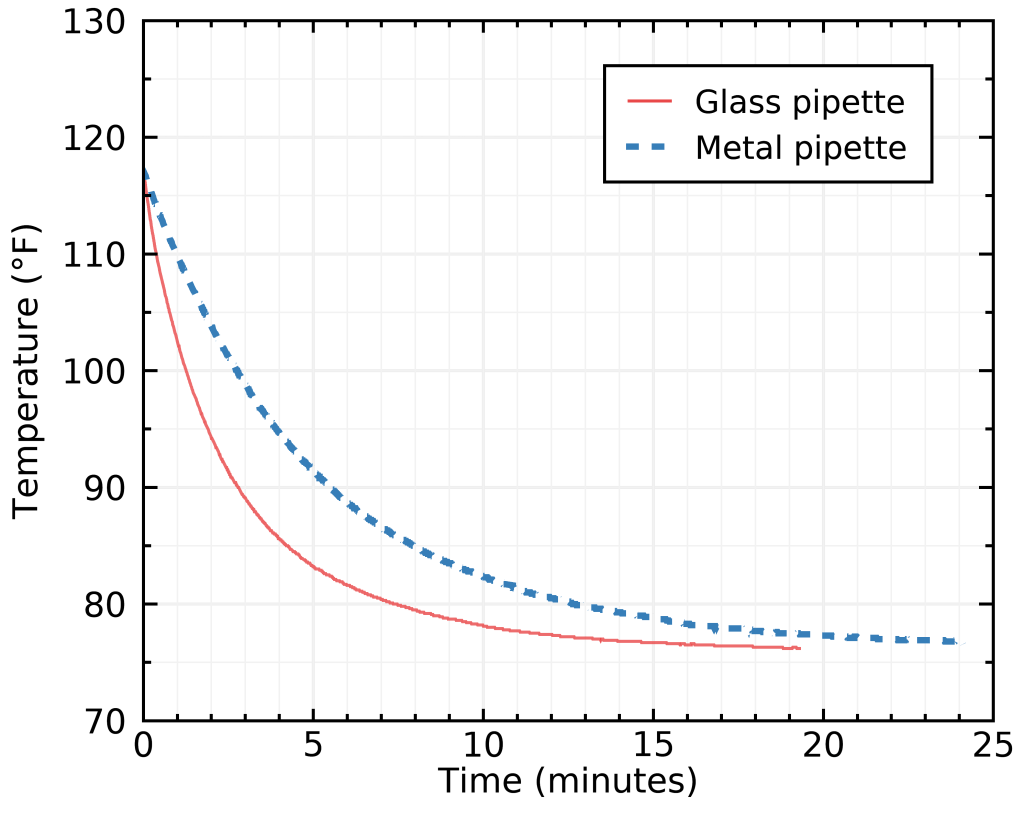
But then I realized that the syringe needle was about exactly how I wish a metal pipette would be, and that the rubber caps that came with my glass pipettes actually fit perfectly on it ! So there you have it, a perfectly fine metal pipette:

After playing a bit with it, I think it did a perfectly fine job, but it actually doesn’t make it that much faster to cool down the sample, and you lose something that I realized I like a lot: seeing the coffee sample inside the pipette. The glass pipette made it much easier to make sure I hit the sample with tap water, that no tap water entered the pipette, and that no condensation was forming inside the pipette.

In the figure above, you can see that the metal syringe also took about 30 seconds of tap water to reach room temperature. This is not an improvement over the glass pipette, so I decided to stick with glass. This may indicate that the flow of water, not the thermal conductivity of the pipette, is what determines the efficiency of this cooling method in this range of materials. Rest assured that using a plastic pipette would shift that balance and make the method way slower, because plastic is an excellent heat insulator.
The Patience Option
I also decided to measure how long it would take to just let each pipette reach room temperature without taking any action, for the most patient among us. The results surprised me at first:
The glass pipette was faster ! I think this is due to the glass having more thermal mass, so it initially takes up a lot of heat from the sample very fast before the full pipette+coffee system need to cool through very slow air conduction. For the metal pipette, the whole thing must happen via air conduction because metal has a very small thermal mass.
If you’d like to do this with samples of about half a mL, the glass pipette took 12 minutes 16 seconds to be only 1°F warmer than room temperature, where the metal one took 17 minutes 38 seconds. I’m giving you the time for an acceptable 1°F difference because actually reaching room temperature takes a very long time (this is an asymptotic process).
The Aluminum Monster
There are a few more things that I tried which involved the freezer. I wrapped the glass pipette in aluminum foil to create an aluminum sleeve and wrapped the outer parts around a few scotch rocks to add thermal mass, and put that device (without the pipette) in the freezer.

You really don’t want to take a pipette out of the freezer because water from surrounding air will condensate everywhere on it, including inside it, which would contaminate your sample.
I tried taking out the aluminum “monster” from the freezer and inserting the glass pipette in it, and here’s what I got:
As you can see, there’s a huge risk of overshooting that is involved, in addition to the method being less practical because you need to build an aluminum monstrosity and let it cool in the freezer between every cup of coffee. I tried varying the amount of scotch rocks (down to zero), but it was still prone to overshooting, and generally much slower than tap water at doing its job.
The Faucet Cooling System
The next thing I tried was the over-zealous, “hide it from your friends” cooling system: I wrapped aluminum outside a glass pipette and connected both ends to 1/4″ rubber tubing, then wrapped the same part of aluminum also around my usual glass pipette. This created a sleeve where I could put my glass pipette in thermal contact with another glass pipette that is part of the rubber tubing:

I then cut the corner of a small 4×6″ vac sealable bag, wrapped a rubberband around the tubing and fixed it inside the vac sealed bag, to create a flexible inlet for the tubing. I wrapped the vac sealing bag around the faucet and held it tight in place with one hand and turned on the tap water to get water running through the system, then out in the sink.

This actually didn’t even spill or explode, which still surprises me. I had to open the faucet gently, but the problem with this system (besides you looking insane) is that the thermal contact between the two pipettes is not great, so it takes a lot more time to cool down the sample, about 10 minutes !
I hope you enjoyed reading this, I certainly had fun messing up my kitchen !

Hi Jonathan,
Apologies if I’m very late asking this question, but how helpful do you feel ~£20 brix refractometers ? Is it worth such equipment at all unless you can afford/have access to the sort of refractometers you use?
All the best
LikeLike
very interesting but at the same time this is exactly why I don’t “play” with TDS 😉
LikeLike
You convincingly show how important temperature is when measuring TDS!
If I understand correctly the whole idea with trapping the coffee in the middle of a pipette is to be able to cool it quickly. The two main challenges as you mention are liquid (or even worse: dry matter from previous samplings in the rubber droppers) and dilution from the tap water. Both can be handled if you are careful, but it seems somewhat cumbersome and slow to me.
If I were to do this in the lab I would simply pipette the hot coffee into a small flip cap tube which can be quickly closed to prevent evaporation. Some condensation may occur inside upon cooling to room temperature, but this is easily dissolved back into the bulk of the liquid by shaking before you open it. Flip cap tubes are cheap and are easy to get hold of from laboratory suppliers.
Pictures: https://www.google.com/search?&tbm=isch&q=1.5+ml+microcentrifuge+tube
Any thoughts?
LikeLiked by 1 person
Yes that would definitely work. The plastic is a good insulator though, so it could take a bit more than 15 min to cool down. Also I dont think the glass pipette will evaporate much from the small opening
LikeLike
> You can optionally measure the distilled water temperature with a bead K-type thermoprobe
I don’t have VST but its documentation says: “To see the temp the instrument is measuring, press both buttons, then release the go first, then release the menu button.”
LikeLike
It works ! Best comment ever
LikeLike