Today, I’d like to take the time to finally write down my latest understanding of how to adjust your pour-over recipes when modifying bed depth or dripper diameter. Some of the details needed me to gather a good amount of experience with different drippers, because sometimes the theory of fluid flow doesn’t necessarily tell you what brew parameters will taste best, even if it is very powerful to understand how the variables are intertwined, and how they affect extraction and brew time.
The first thing I think is important to understand is how changing the dripper diameter, keeping all other important variables fixed, has no impact on the brew mechanics and the resulting cup, in an “idealized” scenario (in the sense that the system is simple, not that the taste is ideal). What I mean here by an idealized scenario is a no-bypass brew, the water does not lose too much temperature from warming up the dripper, coffee bed and environment, the coffee bed is not disrupted, the water arrives uniformly across the bed, and any other difference in fluid flow at the edge of the coffee bed are negligible between the two situations. The next subtlety in my claim above is the part where I say keeping all other important variables fixed. This means:
- A fixed bed depth, and therefore a larger coffee dose,
- a fixed water-to-coffee ratio, and therefore more total water being used,
- dispensing a larger water flow rate from the kettle to achieve the same water column height during the brew,
- and using the same coffee, kettle temperature, and grind size.
Doing so will result in a similar total brew time, TDS and extraction yield, but will simply result a larger batch of coffee. The third point above might seem surprising, but it’s natural if you think about it – the velocity of the fluid between the coffee particles will be the same, and therefore the drip rate per surface area at the bottom of the coffee bed will be the same, but with more surface area, you will obtain a more significant drip rate, which means you need to dispense the water faster with your kettle. This also makes sense if you realize that you are brewing a larger batch of coffee in the same amount of time.
Thus, there are a few of the variables that are changing by a quantity scaling with the ratio of dripper surfaces, all to produce the exact same style of coffee in a larger batch:
- A faster kettle pour,
- a faster total drip rate from the dripper,
- a larger dose,
- and a larger batch of coffee.
In other words, I still use exactly the same recipe that I developed for the Pulsar when I brew with the mini, I just brew with a dose smaller by a factor 0.6 (e.g., 15 grams instead of 25).
The second point is something you should pay particular attention to if, like me, you intuitively use the total drip rate of your device to get a sense of whether you have correctly dialled in your grinder. For example, when I brew 25 grams in the Pulsar, I am hoping to see a relatively thick stream of coffee coming down the dripper, with the associated dripping sound. When I brew with the perfectly equivalent bed depth in the Pulsar Mini (15 grams), however, I expect to see either fast droplets or barely the start of a stream at all, when I am dialled in. At first, this can be surprising, and it could cause you to think that you have clogged the dripper especially given the lack of sounds when the stream breaks. This definitely requires some getting used to, but one trick you can use is to carefully look at the water column height from the side of the dripper – the rate at which it lowers down should be the same regardless of dripper diameter, for a given recipe and bed depth.
As a consequence of the considerations above, I have come to view the diameter of a dripper (or even portafilter – see Lance’s recent video on that topic) as a variable that mostly affects how much coffee you want to brew with that device.
This is one of the reasons that I asked Next Level if they could build a smaller version of the Pulsar, which they named the Pulsar Mini. At the start it was not really for myself, because I was happy brewing 20 grams of coffee in the Pulsar a few times a day. Many of my followers, however, preferred to brew in the range from 12 to 18 grams, which I agreed was not optimal because it produced a coffee bed a bit too shallow for my preference, and therefore it made sense to use a narrower dripper for this.
This is because the depth of a coffee bed, contrary to the width of the coffee bed, is a variable that impacts the flavor of the coffee being brewed significantly, and in a way that you cannot easily compensate for by changing other brew variables. Therefore, I view the bed depth as a much more fundamental brew parameter, alongside with the water-to-coffee ratio, the grind size, the water’s mineral composition and temperature, the dripper geometry, the grinder’s particle size distribution properties, and obviously the coffee.
I believe that changing the depth of the coffee bed affects the brew in four distinct ways:
- It results in a longer brew time and/or a coarser grind size being used,
- it reduces the importance of disruptions in the coffee bed (such as channels in the worst-case scenario, the same depth of a disturbance will affect a smaller fraction of the pathway through the coffee bed),
- it produces a better filtration of anything insoluble (fines, chaff, and maybe large molecules responsible for astringency),
- and it changes the style of extraction especially at the bottom of the coffee bed (the bottom encounters more-concentrated water, potentially already saturated in fast-diffusing chemical compounds, therefore slowing down the extraction of those at the bottom stages).
In the case of drippers such as the V60, it probably also affects the fractional amount of bypass, but that’s a topic for a different day.
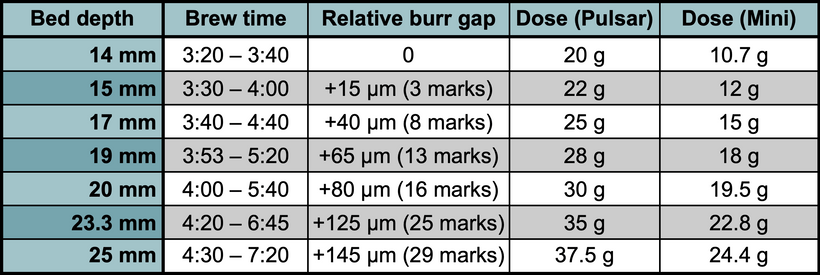
The first point is probably a bit more obvious to those familiar with my blog and my first book The Physics of Filter Coffee, as it can be understood in terms of Darcy’s law which describes an idealized percolation scenario. A thicker percolation medium offers a larger resistance to the flow of water. The basic intuitive reason is that water needs to be deformed more overall to pass through all the particles, and water is viscous and it wants to resist these deformations a bit. Therefore, one must compensate by grinding coarser to reduce the medium’s resistance to the flow of water, or by embracing the larger resistance and using a longer brew time. Based on extensive experience with varying bed depth, I have come to think that the subjective way which I tend to prefer is to do neither of these two extremes, but rather a compromise between the two: when I use a thicker coffee bed, I grind a bit coarser, but I also accept longer brew times. Here is my personal bed-depth cheat sheet, which you might be able to use as a starting point:

These ranges correspond to what I have had a good amount of experience with so far, using a ratio of 1:17. I find that using narrower bed depths is finicky with most recipes, and usually doesn’t taste as good.
The shifts in burr gaps that I give above are in microns, and were only tested for the EG-1 grinder using the lab sweet burrs, but I suspect they would translate relatively well to other grinders, even though the absolute burr gap definitely would not translate, and this is why I have not indicated them – even for other EG-1 users with the same burrs, a tiny difference in the manufacturing of the burrs could lead to a different burr thickness and make the absolute numbers useless.
Notice how both of my taste-based optimal grind sizes and brew times go up with thicker beds. Not only this, but my range of acceptable brew times also seem to widen a bit with thicker beds. I find brews resulting from thicker beds to be generally much more forgiving, and to have a bit more body, sweetness and complexity, even with very light-roasted coffee. For practical reasons, I tend to brew bed depths of about 17 mm with the Pulsar Mini every day, because I find it is a nice dose of coffee to brew at once: it fits in my favorite mugs without having to use a larger coffee pot, and it’s a more reasonable caffeine intake than 20+ grams especially when brewing 2-3 different coffees a day.
There is one of the points above that may sound surprising, and even controversial – the part where I mention a better filtration, even potentially of some compounds responsible for astringency. I do not know exactly what causes astringency in coffee, but I have a suspicion that it is caused by very long molecules, that do not dissolve in water at typical brew temperatures, and may or may not clump together in the brew. Regardless of whether they clump together or not, such molecules are clearly not large enough to be filtered out by the coffee pores in the traditional sense, as even the rare, longest polyphenols are smaller than about 20 nanometers (0.02 microns), and gaps between coffee particles are much larger than this even when pulling espresso shots. What I suspect may happen instead, is that they could stick to the surfaces of rough coffee particles or fines, and end up behaving a lot like fines being trapped and liberated depending on how tortuous and deep the coffee bed is. If you recall that section in my first book, I relate a super interesting paper on this topic. The TL;DR take-out of that thesis for me was that the microscopic fluid velocity was a super important factor in deciding what fines (and potentially long molecules) can remain stuck on the surfaces of coffee particles. And a good rule-of-thumb of what affects microscopic fluid velocity the most is the amount of pressure that you apply to your coffee brew (either with a stronger pump, or a taller column of water above the bed). Therefore, the coffee bed would act on these molecules by filtering them out a bit like oxygen adsorbers keep oxygen in; it just provides a gigantic maze of free surface area for them to stick on, and hopefully the microscopic fluid velocity is gentle enough to not drag them along.
Unfortunately there is no good demonstration that this actually happens, as far as I know, but I suspect it is happening because it is by far the simplest explanation I have stumbled on that could explain all of the macrosopic consequences I have observed when brewing coffee. In particular, this would also explain why I prefer keeping a narrow water column above the coffee bed, and why filter coffee brewed on an espresso machine always seem cloudier and more astringent (except for cases where the pump applies no pressure on the water pooling on the coffee bed, as in Scott’s Filter 3 device). This could also contribute to the reason why shallower coffee beds are more finicky – the smallest disturbances in the coffee bed could provide a region of poor filtration (a channel), which may allow more insolubles in the cup, but even without filtration, smaller changes in the water column height could contribute a lot more variations in microscopic fluid velocity, and therefore in filtration efficiency. Indeed, I find that I can get away with taller water columns when I use thicker beds without causing detectable astringency, as would be predicted by this model of filtration.
Be careful not to take this to the extreme when you brew, however – if you let the water column disappear above your coffee bed, you risk not only lowering the temperature of the coffee bed, but perhaps even more importantly, you are undoing some of the job of your bloom by re-introducing air in your coffee bed (the water dripping below your bed will suck some air in between the particles at the top of the bed), and the water you re-introduce after that on top of the bed will need to displace that air again, which can lead to a reduced drip rate until the air bubbles make their way out. This is similar to watering a dry plant pot – at first the water has a hard time getting through because the displacement of air by a fluid in a percolation medium is not super efficient, and as long as there is air in there, the paths available for fluid flow are partially obstructed.
The realization that I preferred longer brew times with deeper beds resolved a long-standing questioning that I had about batch brews. I was a bit perplexed that typical pour-over brews tasted best with brew times around 3:30, whereas batch brews usually taste best with brew times around 5-6 minutes. I suspect this is simply a matter of bed depth, and that I am just gradually converging to the parameters of batch brews. Who knows if I will keep going up in terms of bed depths until I really reach the typical batch brew parameters, but I know I really love a well-prepared batch brew even though they are usually not that easy to find.
Speaking of which – by happy coincidence, Scott also just wrote a relevant blog post about bed depth (it seems to be on everyone’s mind right now !). Notice how Scott recommends bed depths at the extreme end of my cheat sheet (30 – 35 grams in the Pulsar, corresponding to 19.5 – 22.8 grams in the Pulsar Mini, or to bed depths of 20-23 mm). I don’t have as much experience as Scott does in this range of bed depths, but I am planning to explore this more, as it is entirely plausible that I may end up preferring them to my current 17 mm go-to. If I assume that a linear extrapolation of my cheat-sheet works, I would get the following parameters:

I also added the numbers for a hypothetical 25 mm bed depth, just for fun. Note that this doesn’t even reach the rule of thumb that Scott learned in the 90s for the optical bed depths of batch brews (3 – 5 cm) ! These would require whopping doses of 45-75 grams in the Pulsar or 30-50 g in the Pulsar mini, and I am almost sure that linearly extrapolating my optimal brew times and grind sizes would fall apart so far from what I have tested.
Now I would just like to mention a few words on the topic of espresso. I suspect that using thicker pucks have a similar impact on the percolation mechanics, with two exceptions:
1- I don’t think that filtration is as important here. Because of the pressures involved, the microscopic fluid velocities are much faster, and I suspect that they would dislodge anything that would otherwise be filtered out by the coffee puck. But this is more of an intuition based on fluid mechanics, and maybe I will be proven wrong when we have actual data on this topic.
2- Depending on the context (i.e. using fresh-enough coffee that is roasted dark enough), I suspect that a thicker puck generates more crema, as I have detailed in my book The Physics of Espresso
If you’d like to hear a bit more on these topics of filtration and bed depth, I have also discussed them a bit on the Crafted podcast.