
Photo header credit: Kathy Gagné
Reminder: as an Amazon Associate I earn small commissions from qualifying purchases made through the Amazon links below. I have no association to Hanna instruments, API or Red Fish and don’t receive any benefits from them.
Most of the questions I receive about coffee brewing are related to the craft of brew water, especially when it comes to verifying that its properties are consistent with one’s goal. If you are not familiar with how brew water affects your coffee, I highly recommend reading this previous post I wrote on the subject before you read what follows. I will assume that the readers are familiar with the concepts of alkaline buffer and total hardness, both of which seem to have the most impact on taste. If you have the chance to grab one of the elusive copies of the Water for Coffee book, I also highly recommend it if you would like to learn more about water.
Both my blog and the Barista Hustle website contain various useful tools (e.g., here and here) when it comes to selecting your brew water recipe and crafting it, but here I want to focus on how we can precisely measure the total hardness and alkaline buffer of any water. This can be useful to verify your water recipe came out good, or to check whether your tap water is good for coffee. If you have tap water soft enough to add minerals until you reach a desired composition, this is yet another situation where you will want to know the properties of your original water precisely.

In the past, a lot of focus has been placed on measuring the approximate total dissolved solids in water using electrical conductivity meters like this one. These devices only measure the electrical conductivity (EC) of water as their name suggests, and then try to guess the total hardness of water assuming a specific composition. In general they are not very accurate, but changes in EC measurements can be useful to quickly notice a change in water composition. Most of them claim to apply an automated correction for temperature, required because the temperature of water also affects its conductivity. Unfortunately, I have come to stop trusting any of these claims, and I suggest making sure you always measure your water EC at a fixed temperature (25°C, i.e. 77°F, is typical).
As EC meters are not very accurate, it is natural to wonder if there are better methods available to diagnose your water, and there are ! It is much more useful to directly measure the alkaline buffer (KH*) and total hardness (GH) of your water. If you don’t want to measure both, I recommend going with KH because a bad buffer can really destroy a good cup of coffee. After looking for a while, I found two sets of tools to measure KH and GH, both based on the concept of titration. We will go deep in the rabbit hole of what titration means further down, but for now let’s just focus on the titration tools I found.
*KH is not always equal to the alkaline buffer, but for most water compositions they are the same (put simply, as long as GH is larger than the alkaline buffer we can call the latter KH).
Colorimeters and Photometers

Those are definitely the nicest options if you are able to find them and are willing to spend a couple hundred dollars for your measurements. You only have to add some reactant to a sample of your water, place it in a small colorimeter or photometer device, and you will get the composition of your water as a number on a screen. It is almost as easy as using a refractometer to measure coffee concentration. With typical water recipes, they can reach precisions of about 5-6 ppm as CaCO3 in both GH and KH. This is a very good precision, and should be better than what we can actually taste in the resulting coffee. It’s also very hard to make a human mistake during the measurements, which is not the case with the other tools described below. There are some down sides however; they are usually hard to find and you will need to order reactant chemicals every once in a while. Those that I could find are manufactured by Hanna Instruments. The most relevant ones are:
*Make sure to use the freshwater model, not the saline water model.
If you get tempted by the calcium and magnesium hardness colorimeters like I did (HI-719 and HI-720), don’t get them because their range is only useful for extremely soft water. I personally use the HI-775 for quick KH measurements. It provides measurements in units of mg/L HCO3-, which you need to divide by 1.219 to obtain a measurement in our typical units ppm as CaCO3.

Aquarium Titration Kits
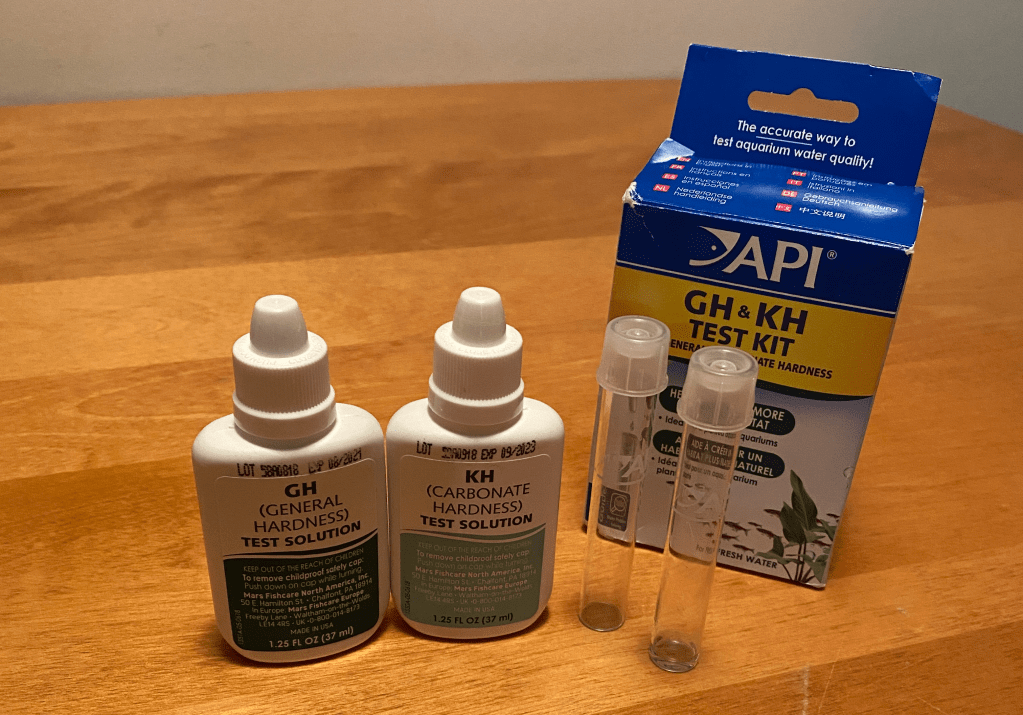
The other cheaper and more widely available option is to go to your local aquarium store and buy titration kits for GH and KH, which are sometimes sold as a single package. The big issue with these kits is that the smallest increments they can measure by default in both GH and KH is about 18 ppm as CaCO3. Maybe this is fine for aquariums, but it’s a bit sloppy for coffee brewing because we generally like to use soft water (for example, a lot of popular recipes have KH at ~40 ppm as CaCO3). They are a bit more difficult to use and prone to human error compared to colorimeters, but they can definitely do a much better job than EC meters.
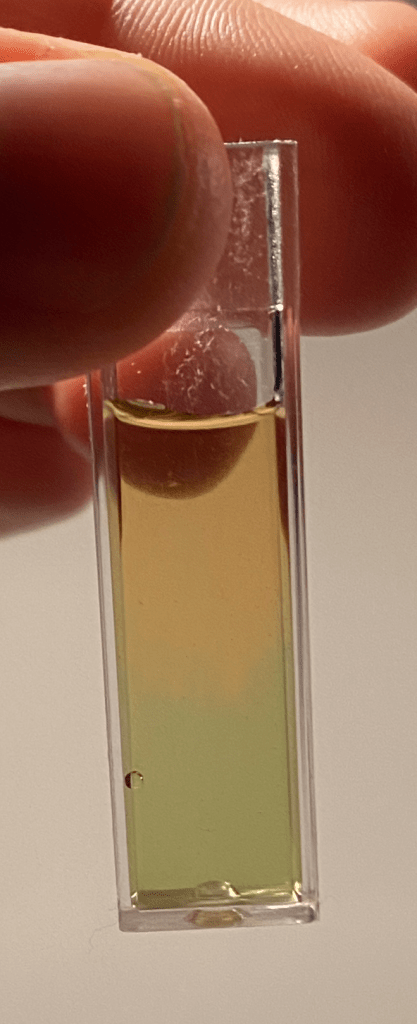

These kits come with a user manual explaining how to perform the measurement; you usually need to put 5 mL of water in a small cuvette, add a single drop of reagent, shake it, then look at the color. Depending on the brand and type of titration kit you are using, different colors will indicate that you are done with your measurement. For the popular API brand, the GH kits go from orange to dark green and the KH kits go from blue to green and then yellow. Once you reach the color turning point, you can look up a table in the user manual to convert the number of reactant drops to a GH or KH measurement – typically, every drop counts for 1 german degree, or 17.85 ppm as CaCO3.
What is Titration ?
Titration is a method widely used in chemistry to measure the concentration of a specific compound in a solution that we’ll call the test solution. The idea is to use another solution, called a reactant, which has a known concentration in another chemical agent that can react with the chemical we want to measure in the test solution. That reactant also contains a color indicator that will change color quickly if none of the compound to be measured is left in the test solution.
Then, the idea is to slowly add a precisely measured volume of reactant in a known volume of test solution, until the compound we want to measure has all reacted away, at which point the color indicator will suddenly cause a change of color. You can then do some maths to calculate how much of the original chemical you reacted away before none was left, because you know exactly how much of the reactant you added.

What I call a “trigger” in the figure above can be the pH of the solution, or other technical properties I won’t get into. The important point is that the color indicator is sensitive to that triggering property. In the example image above, the chemical that serves as a color indicator is sensitive early in the transition, and this indicates that the best measurement will be obtained by using the reactant volume corresponding to when the color transition is completed. Some other reactants and indicators would however have the color transition happen right in the middle of the turning point, which would make the color transition so fast that there would be almost no ambiguity, and therefore the titration would be more precise.
In a laboratory environment, chemists will use very precise tools like burettes in a very clean and controlled environment, allowing them to reach very accurate measurements with precisions as good as about 1% of the measurement. We should not expect to be able to do this with aquarium tests, which are way less precise than volumetric tools. If you’d like to learn more of the technical details behind titration, I highly recommend this website.
What I found about the API GH titration tests is that they use a reactant called an EDTA tetrasodium salt, a large and complicated molecule that can capture calcium and magnesium ions, and triethanolamine, a buffering component that keeps the pH very high to make the transition point very steep. I wasn’t able to find out what color indicator they used however, which makes it unclear where exactly the color transition takes place with respect to the turning point. The KH titration test information is even more sparse; my feeling is that API only publishes as much information as they have to for safety measures, and they keep the rest as intellectual property. The best we can do in that situation is follow their instructions, which don’t clearly specify whether the correct measurement happens at the start or the end of the color transition.
Stretched Titration with Aquarium Kits
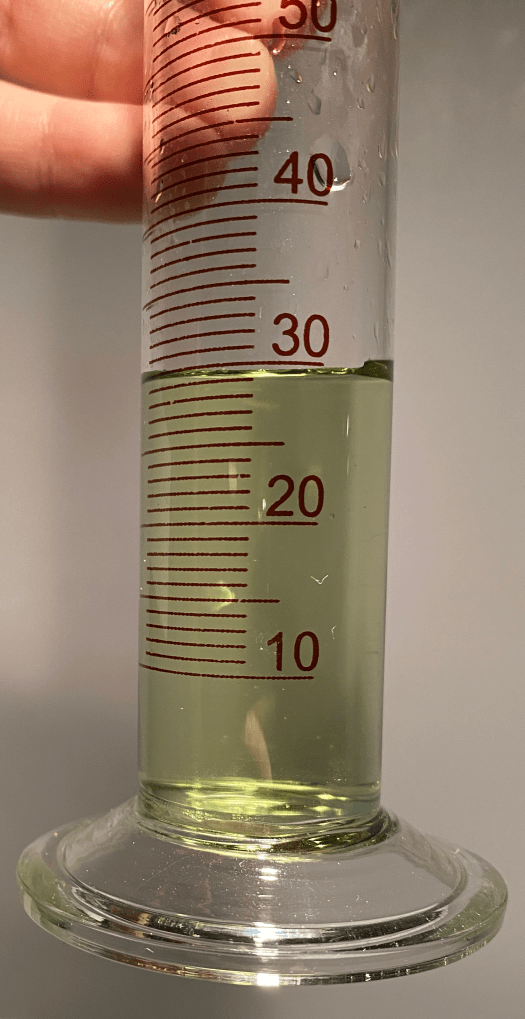
One of the most straightforward ways to obtain a better precision with an aquarium titration kit is to use a larger sample of water, and put more drops of reactant in it. You will obviously need a clear container larger than what is provided by API kits for this. Don’t use any dining glassware, as the reactants are not safe for consumption ! If you double your water sample size, then each drop of reactant will only represent a measurement of half a German degree (i.e., ~9 ppm as CaCO3). This is already much better, but it can quickly require a lot of reactant especially with harder water. I built a Google spreadsheet to help you determine your measurement and precision with this method. If you are pretty sure that you added the exact number of drops required for the color transition, leave the “Precision for number of drops” to one, but if you are not entirely sure which one of the last two or three drops caused it, you can use errors of two or three drops accordingly; the spreadsheet will include this in your final KH or GH measurement error.
I purposely set a maximum achievable precision of 5% of the measurement and 5 ppm as CaCO3 in the spreadsheet (this is true of the other methods below as well) – I don’t think it is likely we will get better measurements in a non-laboratory environment and with the specific chemicals that the API aquarium kits use for titration. You would hit a couple systematic problems if you tried to obtain a better accuracy. For example, the titration curves of the API kit have a smooth part near the transition point which will make the point where the color changes less obvious in those situations.
If I did not put these limits on precision, you may use a large sample and think you have measured KH with a 0.1% precision, when in reality you may be 5% off. Another example of a systematic error is the fact that magnesium reacts slightly differently than calcium with the API test kits, and because they do not know your water’s Mg/Ca ratio, they use the properties of calcium only to translate your reactant volume into a GH measurement. Other problems could include using a cuvette that is not perfectly clean or dry, not having shaken the reactant properly, having left water sample to evaporate a bit, or even having lost a couple milligrams of your sample when you shook it. As you can imagine, those are all things you should try to avoid !
Here are step-by-step instructions for a stretched titration:
- Thoroughly clean and dry the glass cuvette.
- Wear clean and dry protective gloves.
- Measure a precise volume of brew water (API’s default is 5 mL).
- Shake the reactant thoroughly and open it.
- Add a single drop of reactant and stir/shake well (depending on your cuvette).
- Look at the solution color in front of a white wall in a well-lit environment.
- Keep going until you see a color shift happen, and make sure you don’t lose the count of reactant drops.
- Stop counting when the full solution color has noticeably shifted even after you stir/shake the cuvette for a dozen seconds.
Back Titration with Aquarium Kits
There is one neat trick called back titration that we can use to reach a better precision without needing all the additional reactant. The idea is to put a fixed, small number of reactant drops in the cuvette, and then add your brew water one drop at a time until the reverse color shift happens. Because we reversed things, now a KH kit would go from yellow to blue when you reach the transition point. Translating your experiment into a measurement is a bit more complicated in this scenario, so I also included a back titration calculator in the Google spreadsheet to help you doing it. The more drops of reactant you started with, the better precision you will obtain, up to a limit. However, you will also need to add a lot more drops of brew water especially when measuring soft water, and it can become easy to miscount them or place a drop outside or on the sides of the cuvette if you are not focused enough.
One thing you will need to do before you can use this method is calibrate your particular pipette with a milligram-precision scale like this one so that the spreadsheet knows the average weight of one of its water drops. There is a space just for that in the Google spreadsheet; simply fill it up with the weight of 25 drops obtained with your pipette in milligrams, and the spreadsheet will do the rest. Otherwise, you could use the exact same pipette as I used (sold by Ronyes Lifescience) and leave the default values in the spreadsheet. Make sure you put the rubber cap on the size with the larger hole.
Here are step-by-step instructions for a back titration:
- Thoroughly clean and dry the glass cuvette.
- Wear clean and dry protective gloves.
- Shake the reactant thoroughly and open it.
- Put a single drop of reactant in the cuvette.
- Add a single drop of water and stir/shake well (depending on your cuvette).
- Look at the solution color in front of a white wall in a well-lit environment.
- Keep going until you see a color shift start to happen, and make sure you don’t lose the count of water drops.
- Stop counting when you first see signs that the color of the full solution has started shifting noticeably. It will keep getting more obvious if you add more water, but use the moment where you first noticed it clearly as your number of drops.
- If you went past the color shift or want a better precision, add another drop of reactant and then keep adding water again. You will just need to update the number of reactant drops in the calculator, and don’t forget to always count the total drops of water that you added since the very start.
Scale-Assisted Back Titration with Aquarium Kits
As it can be hard and annoying to count many drops of water, I thought of a better way to do this, but it requires using a milligram-precision scale. The idea is to use weight instead of volumetric measurements, and translate those back into GH and KH using known properties of the reactant and water. Having only access to API-brand kits, I made the required measurements for their specific types of reactants only.
To perform a scale-assisted back titration, first place your titration cuvette on the scale and note the total weight. Then add the desired number of reactant drops (remember that more drops will get you more precision), and note down the updated weight. Now start adding drops of your brew water one at a time. You can pick up the cuvette, shake it, and place it in front of a well-lit white wall to make things easier. I recommend noting the total weight at every step (without taring) in case your scale turns off automatically when you take too long. Put the cuvette back on the scale when you reached the color turning point, and note down the water weight that you needed. From these measurements you can deduce the total weights of water and reactant, and enter them in the spreadsheet to obtain your KH or GH measurement, with its measurement errors.
I highly recommend using this method at a room temperature in the range 18-25°C, because otherwise the mass density of the reactant drops and water could change too much, which would falsify the mass to volume relations that I hard coded into the spreadsheet. This method is a lot more robust against human error compared to a regular back titration. The step-by-step instructions are the same as a normal back titration; you just need to keep track of total water and reactant weights as you go.
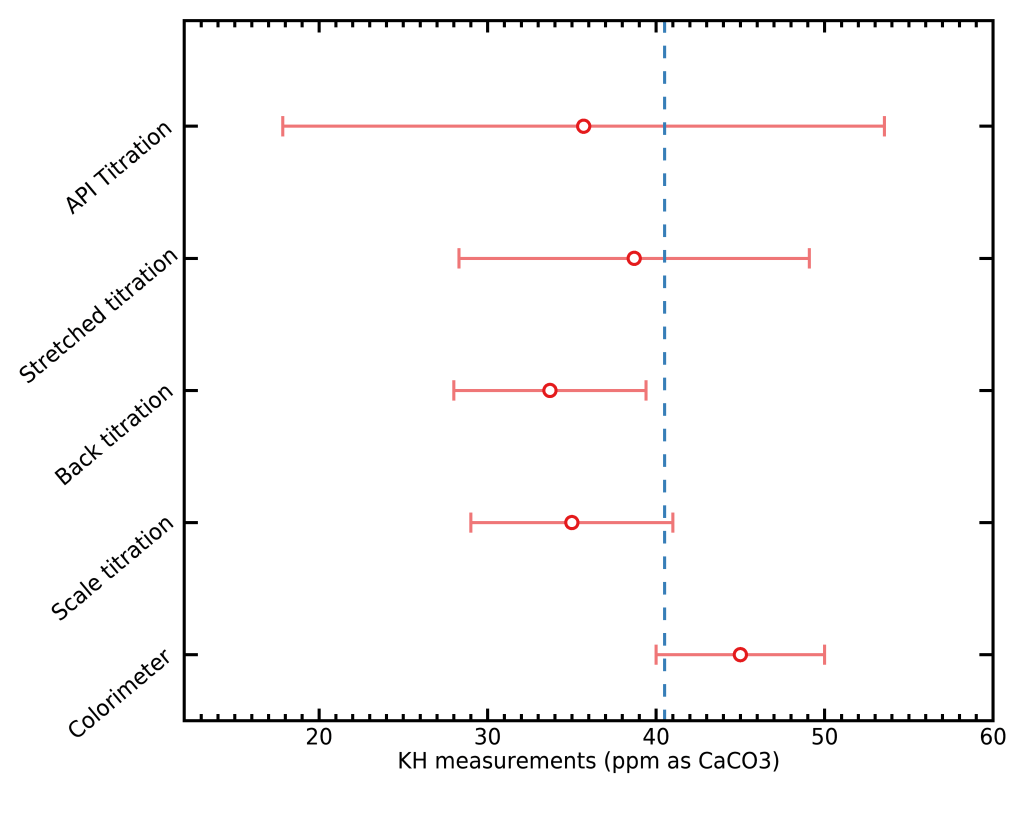
Testing the Different Methods
I decided to measure my Rao/Perger brew water with each method to verify that the expected accuracies were reached. Here are visualizations of each measurement with its error bars obtained with the web tool, and compared to the expected value for the water recipe I used, shown as a vertical blue dashed line (40.5 ppm as CaCO3).
When to Use Which Method
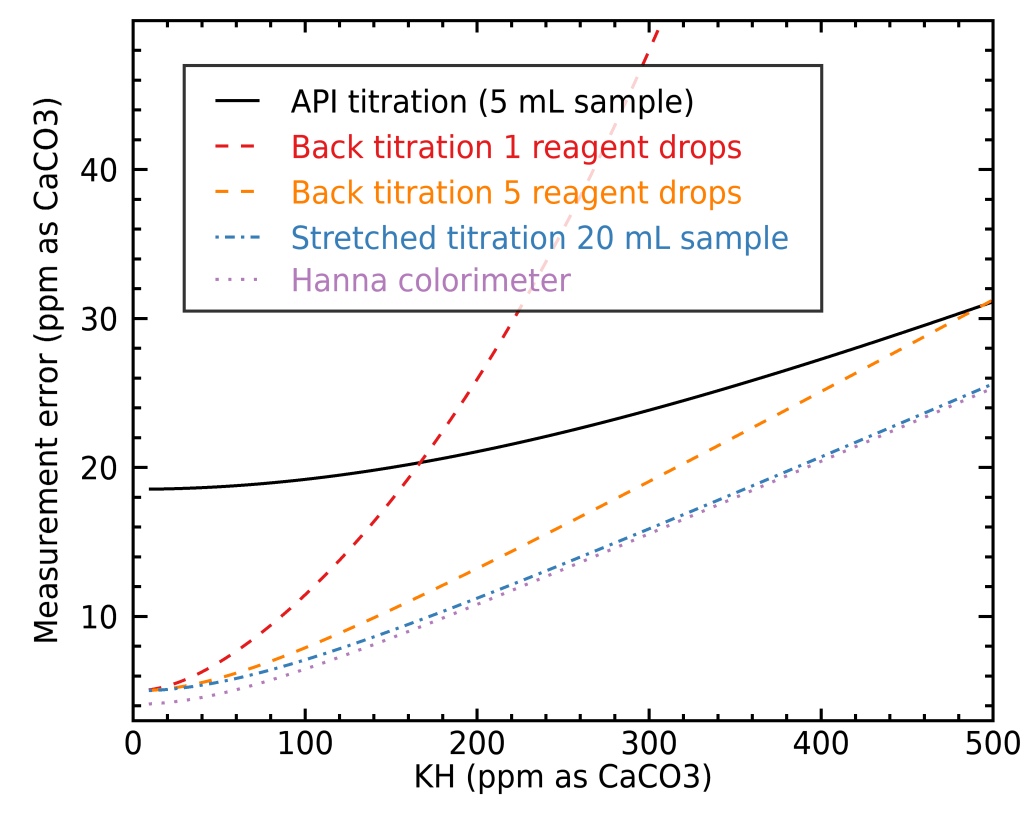
In order to illustrate when each method is preferable, you need to have an idea of whether your water is very hard or soft, and what type of precision you want to achieve. To help you decide, I built a figure illustrating the fractional error you would get for KH measurements with the different methods mentioned here, depending on your water’s total alkalinity:

The case for GH is very similar so I didn’t show a separate figure for it. As you can see, stretching the API titration kit to a 20 mL sample instead of 5 mL will easily get you a very good precision, but it can be very costly in terms of reagent, especially with harder water. To illustrate this, let’s look at how much reagent a stretched normal titration requires compared with back titration:
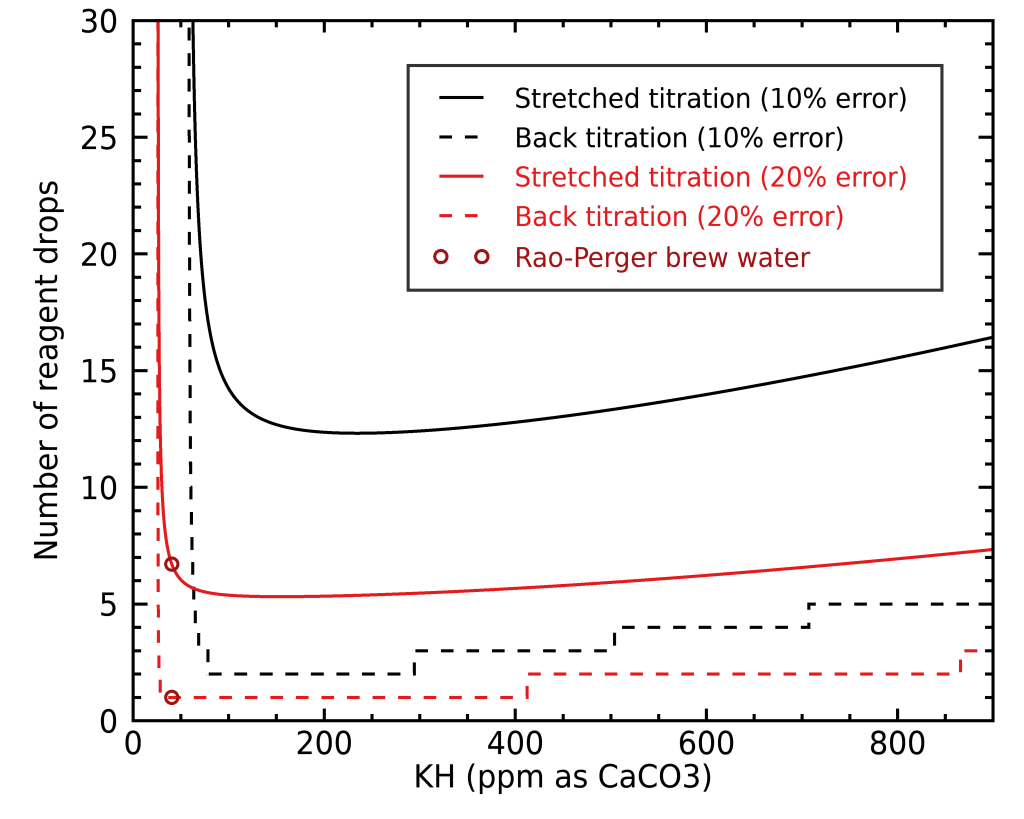
Here we can really see the strength of back titration: it requires way less reactant to reach similar precisions. This is especially true in the case of hard water, where a lot of reactant can be otherwise needed. If you like to see the absolute error for different methods rather than the fractional errors, then I’ve made an alternate figure for you:
Red Sea Titration Test
After I wrote this post, a friend of mine Victor Malherbe told me about another nice option: the Red Sea Fish titration tests. They have titration kits for total alkalinity, calcium and magnesium hardness with the following precisions; they seem especially interesting for their KH precision:
- KH: 2.5 ppm as CaCO3 (i.e., 0.5 meq/L),
- Calcium hardness: 12.5 ppm as CaCO3 (i.e., 5 mg/L),
- Magnesium hardness: 82.4 ppm as CaCO3 (i.e., 20 mg/L).
As a reminder, general hardness (GH) is the sum of calcium and magnesium hardness. I suspect their calcium and magnesium hardness tests could also be stretched and reversed !
Hopefully this post will make water measurement simpler and clearer for some of you !

If we are using a Comm-100 to measure the total PPM, what conversion factor should we use? 5 or .7?
LikeLike
Apparently it can do both, so it depends how you set it up. It can probably display EC so you could also check by dividing TDS/EC
LikeLike