
Reminder: as an Amazon Associate I earn small commissions from qualifying purchases made through the Amazon links below. I have no association or commercial agreements with Weber Workshops or other products mentioned below.
Now that I have gotten comfortable with pulling good-tasting shots with the Weber Workshops EG-1 grinder paired with SSP’s ultra-low-fines burrs, I think it is time for me to share my experience. The SSP ultra-low-fines burrs (I’ll use “ULF” for short) were not initially designed for espresso, because their explicitly stated goal is to minimize the amount of very fine coffee power produced when grinding coffee.
If you are not familiar with grinding mechanics, we usually refer to the distribution of coffee particle sizes that come out of a grinder by the term particle size distributions. They are a visual representation of how many coffee particles you get for each size of particle, and for most grinders they look something like this:
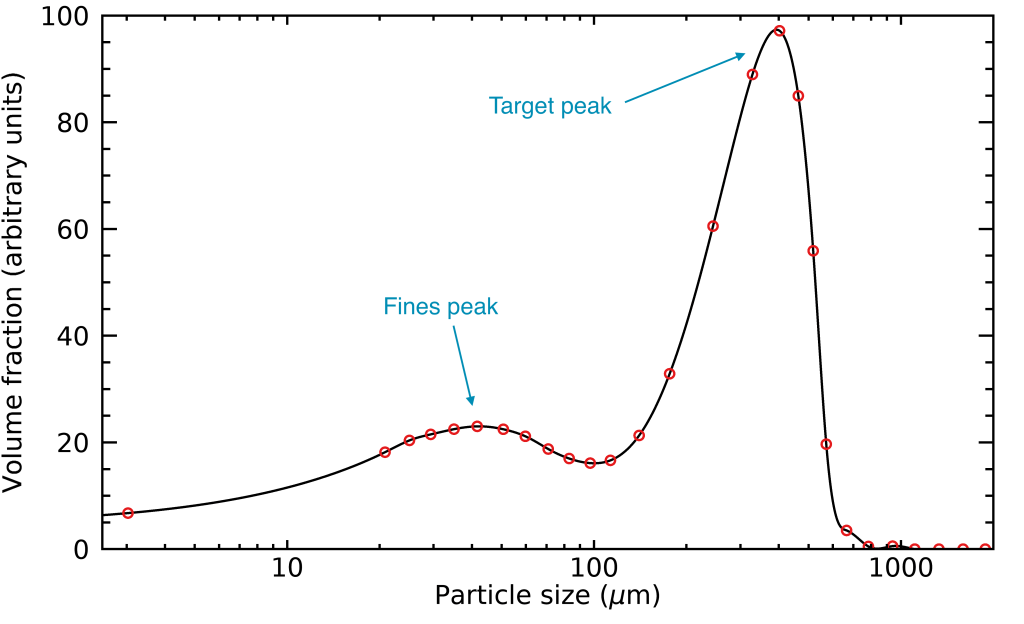
Basically, you have a peak at larger particle sizes that depends on how much spacing you have between the grinder burrs, which is usually how we adjust our desired grind size. As you change your grind size, this peak will move left or right, towards smaller or larger particle sizes. This is why I refer to this peak at the right as the “target peak”, because it consists in coffee particles of the desired size, and which we have control over. The width of the target peak can change from one grinder to the next, and it also depends significantly on burr alignment and perhaps even more importantly, on the geometry of the burr teeth, and on the burr materials and coating, both things that I do not think get their fair share of appreciation. The rotation speed of a grinder can also affect the width of the target peak, but in my experience the exact effect it has seems to be very different for different types of burrs.
The other peak at left consists of particles of a much smaller size. Those are what I usually call coffee fines, and I’ll therefore refer to this peak as the “fines peak”; they are a consequence of crushing the coffee beans rather than cutting them cleanly, and their size depends on the microscopic structure of coffee beans. I believe it is not a coincidence that, regardless of the grinder, burr, and grind size, this peak is always located near the actual size of coffee cells (about 40 microns). I think this is a consequence of fractal-like patterns of fractures that arise when crushing beans that stop propagating to smaller scales when they get to a similar size as the coffee cells, and they have no significant structure smaller the cells to propagate into. But in short, the most important point here is that the location of the fines peak does not move left and right as you change your grind size. Rather, the amount of fines will change, which means that the height of the fines peak will change if we represent it in a figure like the one above. When we grind finer, we apply more cuts to the beans, and force them through a smaller gap, and both effects tend to increase the production of fines.

If you are familiar with my Grind Size Application, you may be wondering why you have not observed the fines peak of your grinder; this is simply because it is extremely difficult to measure the fines peak with any imaging technique. It would necessitate using a microscope to image the fines, and you will face several other hurdles like fines sticking to each other and to larger coffee particles. Laser diffraction is one of the only methods that can easily measure the fines peak, but it necessitates expensive equipment.
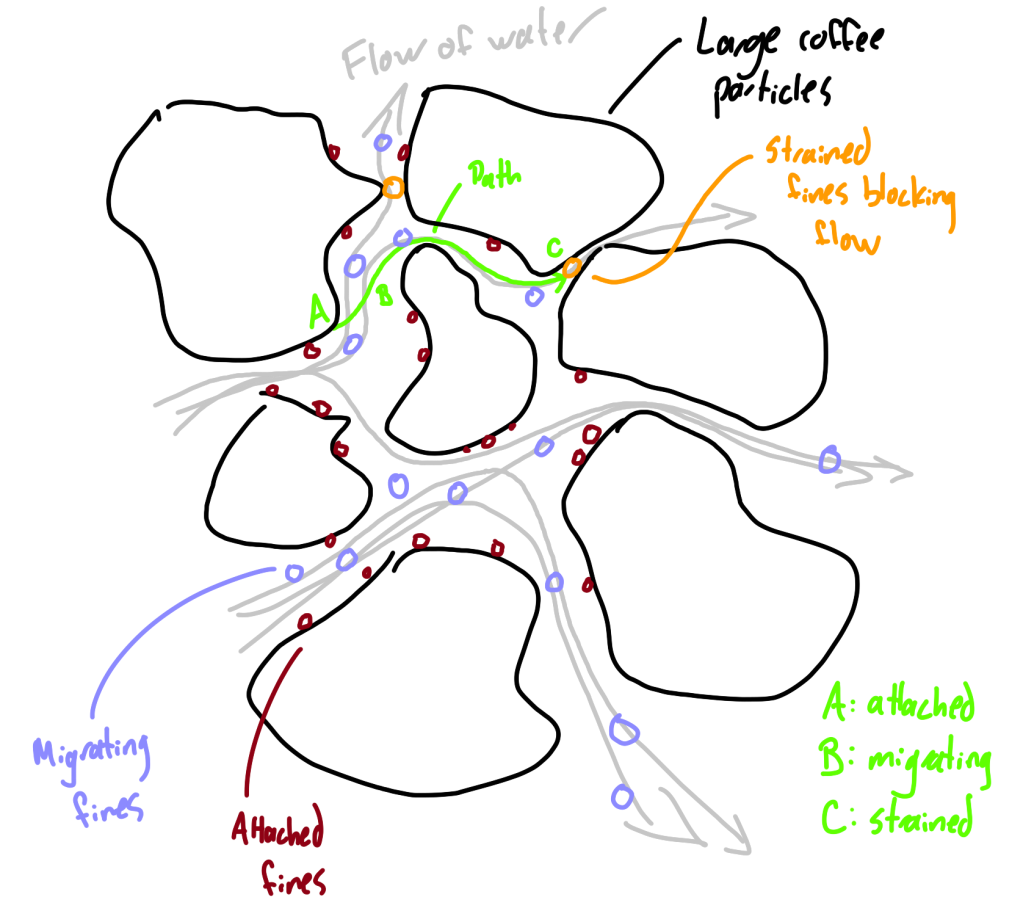
Fines play more than one role when brewing coffee. They very quickly give out all of their soluble content when they come in contact with water because they consist of mostly partially broken coffee cells, but this is perhaps not the most important point because the fines usually only make up a very small fraction of the coffee mass, even when they vastly outnumber the other particles in terms of number. One much more noticeable effect of fines is how they affect the dynamics of percolation, i.e. how water flows through a bed of coffee. They play a dominant role in controlling the rate at which water flows through the coffee bed, as is already well known in geophysics (e.g. see page 107 of this manual) and has recently started to be appreciated in the context of coffee (e.g., see the recent paper Eiermann et al. 2020). But they are even more tricky, because fines can often make their way between larger coffee particles and migrate through a bed of coffee with the flow of water. This is yet another already well-appreciated phenomenon in the context of geophysics, but I have not seen it discussed as much in the coffee industry. I spend a great deal of pages talking about this in my upcoming book The Physics of Filter Coffee.
Minimizing the production of coffee fines is a relatively widely desired goal when grinding for filter coffee, because fine coffee powder tends to clog paper filters more easily, and any uneven distribution of fines across a coffee bed can result in an uneven flow of water, and thus in more uneven extraction of the coffee flavors. I have used my ULF burrs for years with filter coffee and have really enjoyed them over any other combination of grinders or burrs that I got to try.
However, in the context of espresso preparation, seeking to answer whether fines are desired or not can lead you into heated debates over which is better than the other. There is one reason the answer is not that simple: using pressure makes it much less likely that fines will cause significant clogging, unless you are in the presence of an ungodly amount of fines. Some decaffeinated coffees, for example, can generate quite spectacular amounts of fines that even the worst Ethiopian beans won’t come close to; I only know this because I have now started to recognize the effect of fines on my DE1 Decent Espresso Machine’s graphs, but this is a topic for another post entirely (it’s on the top of my list of upcoming posts).
Now, fines don’t really clog espresso shots, but they still migrate through the coffee bed. In fact, they migrate way more easily than in the context of filter coffee, because the finer grinds and applied pressure cause the water to flow at much faster speeds microscopically (even when the resulting drip rate is similar). The faster flow of water is able to drag the fines more easily with it, and it is able to dislodge even the smallest of fines that may otherwise hide efficiently between the cracks and irregularities of larger coffee particles (don’t take my word for it; take Yulong Yang’s words, who wrote his Ph.D. thesis on that matter). Even if you place a paper filter below your coffee puck, fines will easily migrate through that filter with the typical amounts of pressure that an espresso machine applies. Typical drip coffee uses a pressure drop equivalent to about 0.008 bar, so really using any kind of pumps, or even an Aeropress plunger, places you in a totally different context.
If fines migrate and they don’t get trapped anywhere on the way, it means that they land into your beverage. This is not too surprising, as they play an important role in the texture and mouthfeel of typical espresso beverages. For more discussion of this topic, you can refer to the book “Espresso Coffee: The Science of Quality” (Amazon affiliate link) by Illy & Vianni. I have come to think that fines are also important for the stability of espresso crema, if that’s something you’re into. If you ask me, crema is really beautiful, but I tend to agree with James Hoffman that it doesn’t taste any good.
So, what could be the point of removing fines when preparing espresso ?
I think there are two valid reasons why one may want to try that. First, removing the mouthfeel and texture could be a valid goal, because it will increase beverage clarity and make it easier to tell apart the differences between different coffee origins, much like a well-prepared drip coffee can achieve. Now, please don’t think I am saying this is the only acceptable goal for espresso; after having tried both quite extensively, I must say that I really enjoy espresso with a thick mouthfeel like I can achieve with the stock burrs of my EG-1 grinder, or with the Niche grinder. However, I generally find these kinds of shots harder to dial in, and I eventually tend to get bored of it because I find that different coffees end up tasting a bit more similar.
A second reason why removing fines may be desirable is that it will allow you to grind way finer, and extract a lot more of the coffee solubles in the same amount of time, and with the same amount of water. Remember that fines play a very important role in determining how fast water flows through your coffee bed; you don’t need to remove such a large fraction of the fines to start seeing a significant change in your drip rate, and you may need to grind quite finer to compensate. In fact, I suspect that this is the only reason why every coffee beans require to be dialled in differently when pulling espresso shots. In my upcoming book, I presented data from my imaging software to show that coffee beans that come from vastly different origins, varieties and processing methods do not result in significant differences of target peak widths, but I think they can result in a much more variable amount of fines.
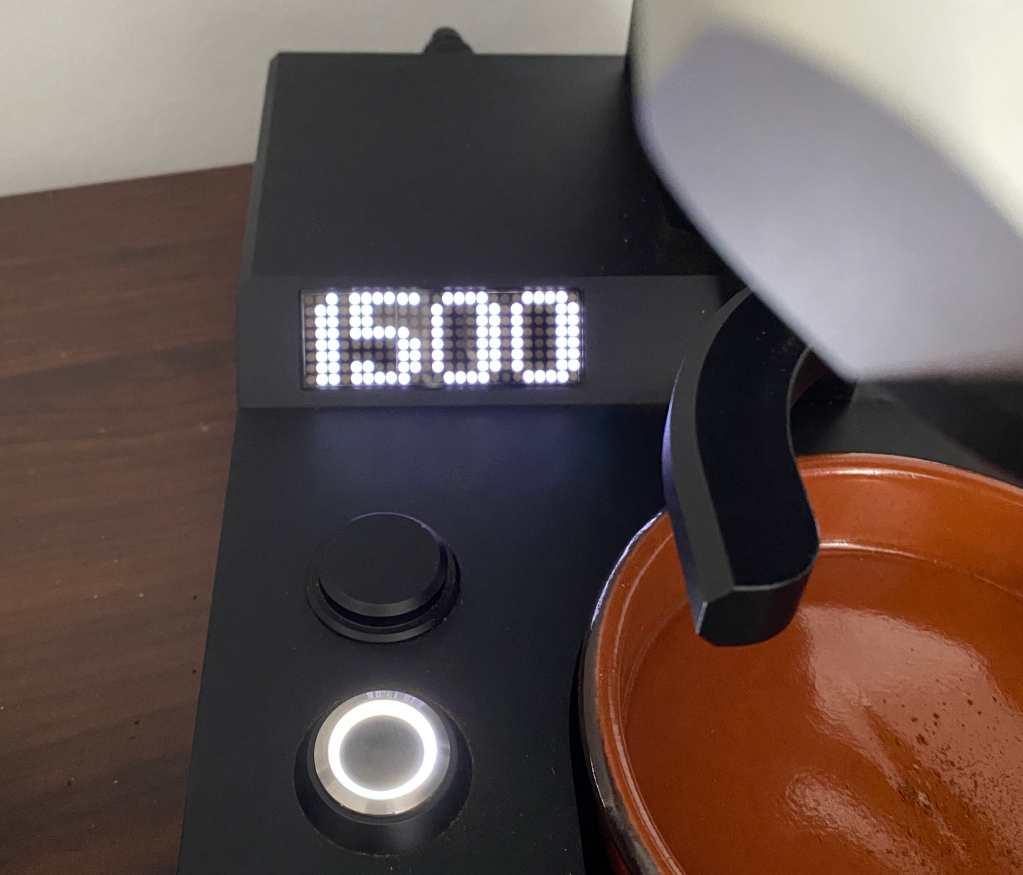
Grinding much finer can come with its own set of hurdles, however. In my example, the EG-1 grinder uses a PID-controlled low-torque motor to adjust its grind speed live and keep it as constant as possible while grinding. The rotation rate can be varied anywhere from 500 to 1800 rotations per minute (or rpm). However, the SSP ULF burrs were not designed to be used for espresso with the EG-1, and they produce so little fines that one must grind so much finer with them that the EG-1 has to be used at higher rotation rates when doing so. Otherwise, maintaining a slow rotation rate while grinding through harder beans can overload the capacity of the motor—it will stop before any damage occurs, but this means you will have to widen the burr spacing and grind the rest of your dose at higher rpm, or in other words you just wasted that dose of coffee. After having done extensive testing even with the hardest ultra light-roasted washed Kenyan beans (or I should say rocks), using 1300 rpm has never caused a motor overload in several months of use. Just to be safe, I use 1500 rpm and I feed the beans in slowly, because I really hate wasting a dose of coffee. To give an approximate idea, I feed 18 grams of beans in approximately 40 seconds while grinding.
Many in the coffee industry have indicated a preference for using slower rpm when grinding, and it has its share of advantages because it reduces popcorning (the coffee beans jumping back and forth before entering through the burrs), especially at very fine grind sizes, and it tends to reduce the amount of coffee clumping and caking, which can result in uneven flow if it is not properly rectified with further steps like the Weiss Distribution Technique. This may be a partial consequence of the reduced amount of friction that results in less static electricity, but if you grind fine enough, other phenomena like the Van der Waals attraction between coffee particles can become important too, and even without static electricity you can observe some caking and clumping that just happens as soon as high-velocity particles of coffee hit each other or the sides of your grinder’s exit chute. This leads me to yet another reason why lower rotation rates may be desirable; less caking against the grind chamber and the grinder’s exit chute means less retention and staling of coffee grounds within the grinder.
I have often seen claims that higher rotation rates also impact the flavors of coffee because of additional generation of heat, however I am still quite skeptical of this claim in many contexts. As Christian Klatt, a former service product manager of Mahlkönig pointed out in one of his talks, higher rotation rates will generate more heating of the burrs over an extended period of use, but extensive testings at Mahlkönig’s labs demonstrated that the coffee itself actually gets heated less at higher rotation rates because it travels faster between the burrs and has less time to get heated up in the process. I am therefore skeptical that lower rotation rates have a positive impact on flavor, and I cannot say with any certainty that I perceive a difference in taste between high and low rotation rates. However, I can very much understand the benefits of having less clumping, less retention and less popcorning.
In short, the hurdles that come with using the ULF burrs for espresso are all related to having to grind very fine and at faster rotation speeds, and can be summarized by:
- the grinds clumping more easily and requiring the use of the WDT technique;
- having to feed the beans slowly into the grinder;
- more popcorning of the coffee beans which means a slower grinding (this is only true when grinding extremely fine with a low-torque motor);
- more potential for making a mess on your counter, especially when grinding this fine.
However, I don’t think these hurdles should stop you from trying. After some time, I have managed to deal with all of these issues, and I have come to prefer the ULF burrs over all other options I have tried so far, especially when paired with Scott Rao’s blooming shots and the paper filter sandwich method on the DE1 machine. In the past few months, I have logged the extraction yields of my daily shots and they all fell in the range 25—29% when measured without VST syringe filters (i.e., those extraction yields are artificially too high by about 1-2% because of undissolved solids and fines in the cup). Filtering my samples with the VST syringe filters have usually yielded average extraction yields in the range 23—25%, but I have done it much less often because these single-use filters are wasteful and expensive.
In fact, I have already completed an experiment that will be the subject of my next blog post, where I compare the EG-1 and ULF burrs with the Niche grinder using twelve 1:4-ratio blooming shots, and I found a consistently that the EG-1+ULF extracted higher by 1.4 ± 0.3% in terms of average extraction yield. If you are wondering, I never drink blooming shots with ratios above 1:3, but I used 1:4 in this experiment to see where the hydraulic resistance of my espresso puck behaved past 1:3.
Taste-wise, I have found the ULF blooming shots to bring out origin characteristics more clearly, with a lot more sweetness, juiciness and fruity flavors. However, pair them with darker roasts and they will bring out the worst in them, mainly harshness and bitterness. In fact, I find these types of shots to approach filter coffee a bit more, although in a much more concentrated way. Going back to filter coffee these days has had me very disappointed in comparison; we’ll see if this is just a novelty effect, but it has already lasted for several months now. Using the stock EG-1 burrs or the Niche grinder has gotten me some great-tasting shots too, but they were a bit less intense and not as clean and distinctive.
I know many will ask me the details of how I use the EG-1 with ULF burrs to pull shots, and several have already asked that question. It is not easy at first, because it is less forgetful of bad puck preparation and requires you to grind so fine that I was initially uncomfortable with it. Hence, I will detail exactly how I do it here. There are two pieces of equipment that I think are really crucial to do a good job: a portafilter funnel (I use Decent Espresso’s tall funnel) and a good WDT tool (I use Levercraft’s tool). I do not use Weber Workshop’s blind shaker that comes with the grinder. While it did a nice job of breaking clumps and distributing for filter coffee and with more classical espresso preparation, I have not succeeded in using it with the ULF burrs. They require me to grind so fine that any kind of agitation of the grounds cause caking for me. If any of you managed to make the shaker work with ULF shots, please let me know.
After having tried several different methods and read technical reports on the handling of very finely ground materials, I have come to the conclusion that the least amount of manipulation of the coffee grounds tends to be best when dealing with such finely ground powder. The only exception to this is WDT and tamping, but I’ll come back to those. But otherwise, I highly recommend dosing directly into the portafilter. Do not use any kind of dosing cup, and do not touch the grounds with your fingers. In the context of grinding this fine, I would recommend against using the Ross Droplet Technique (RDT) method where one sprays the coffee bean with water before grinding, because humidity may increase clumping even if it eliminates static. After some preliminary tests, clumping indeed seemed slightly worse when I used RDT.
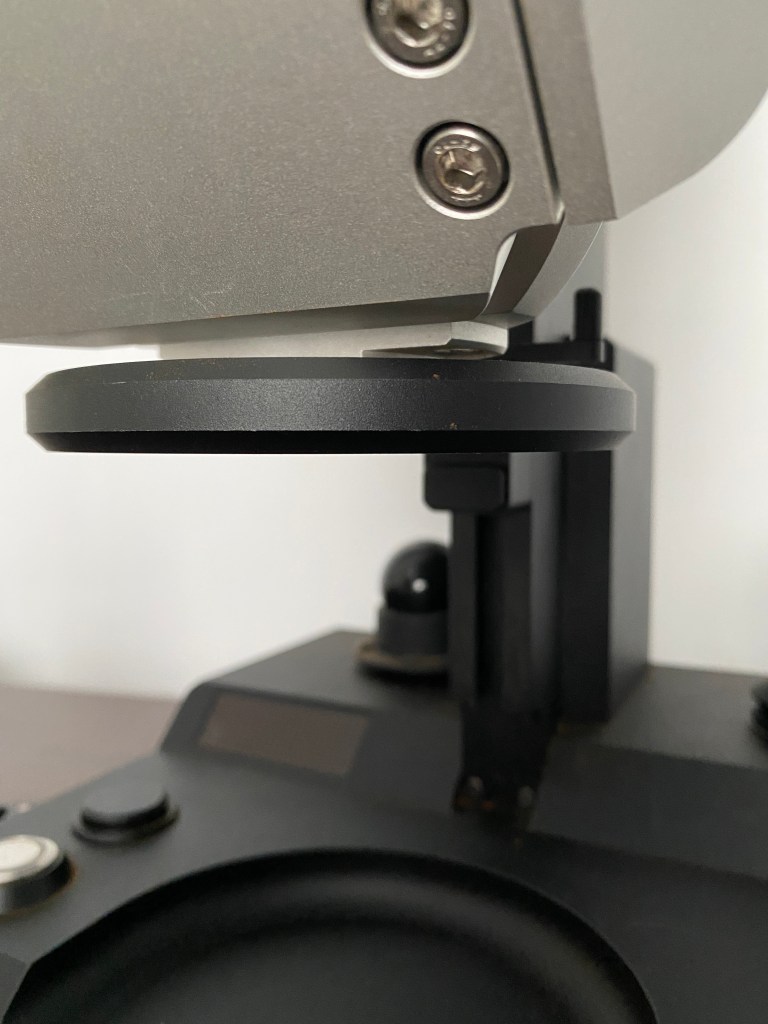
I have figured out a way to use the rails on the EG-1 such that I get almost no single grind of coffee to fly out on my counter when grinding ULF shots, and in a way that also minimizes retention. The EG-1’s design already does an amazing job at minimizing retention, but we are really working in a rough regime with ULF shots that require such fine grinding at high rpm. First, remove all of the forks on the grinder, and then place only the rail ring until there is a gap of a few millimeters between the ring and the knocking lever. The ring should be placed upside down, such that it can be lifted up, not down, when you press on it.
If you want to minimize the amount of coffee flying out, I also recommend placing something like aluminum tape that you cut out in the shape of the exit chute on top of the rail ring, as shown here:

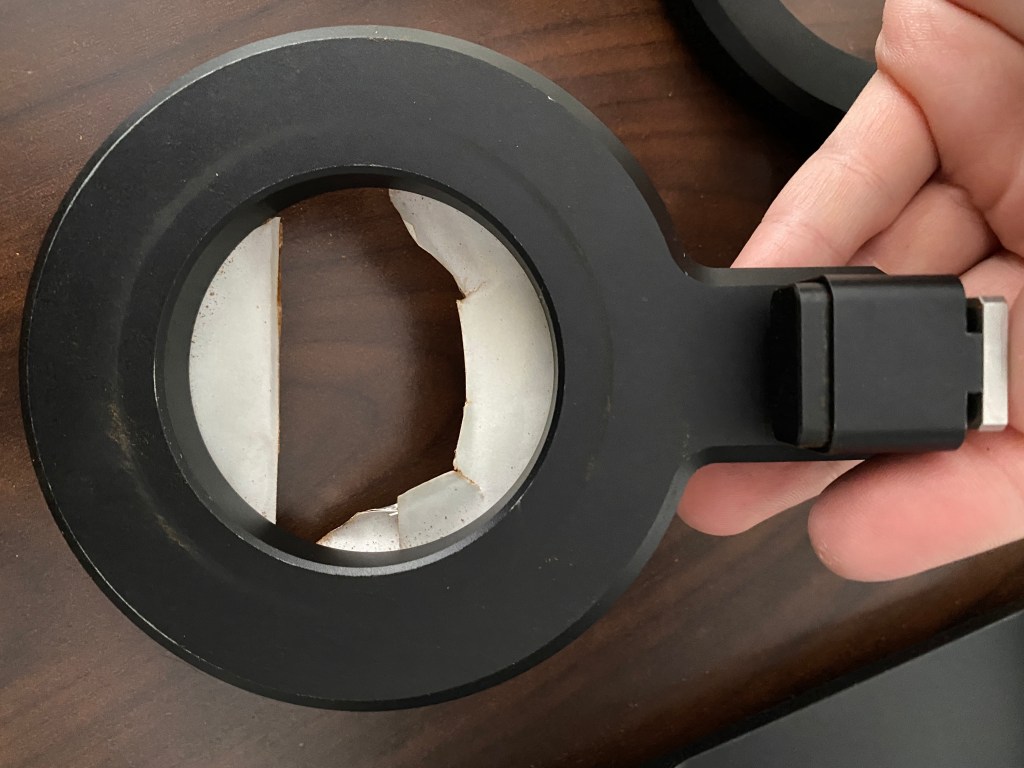
Just make sure you place something at the bottom side of the tape such that coffee grounds don’t stick on it. I like aluminum tape because it doesn’t stick too hard on the fork either, so it’s easier to remove it without gumming up the ring.

Next, place the rail fork, also in the direction where it can be lifted up, not down, with your finger. Next, place your portafilter and funnel on the rail fork and lift the fork up until the upper side of your funnel gently touches the rail ring but without it lifting the ring. This will allow you to use the ring as a secondary knocker, by lifting it up and letting it knock against the funnel, like this:
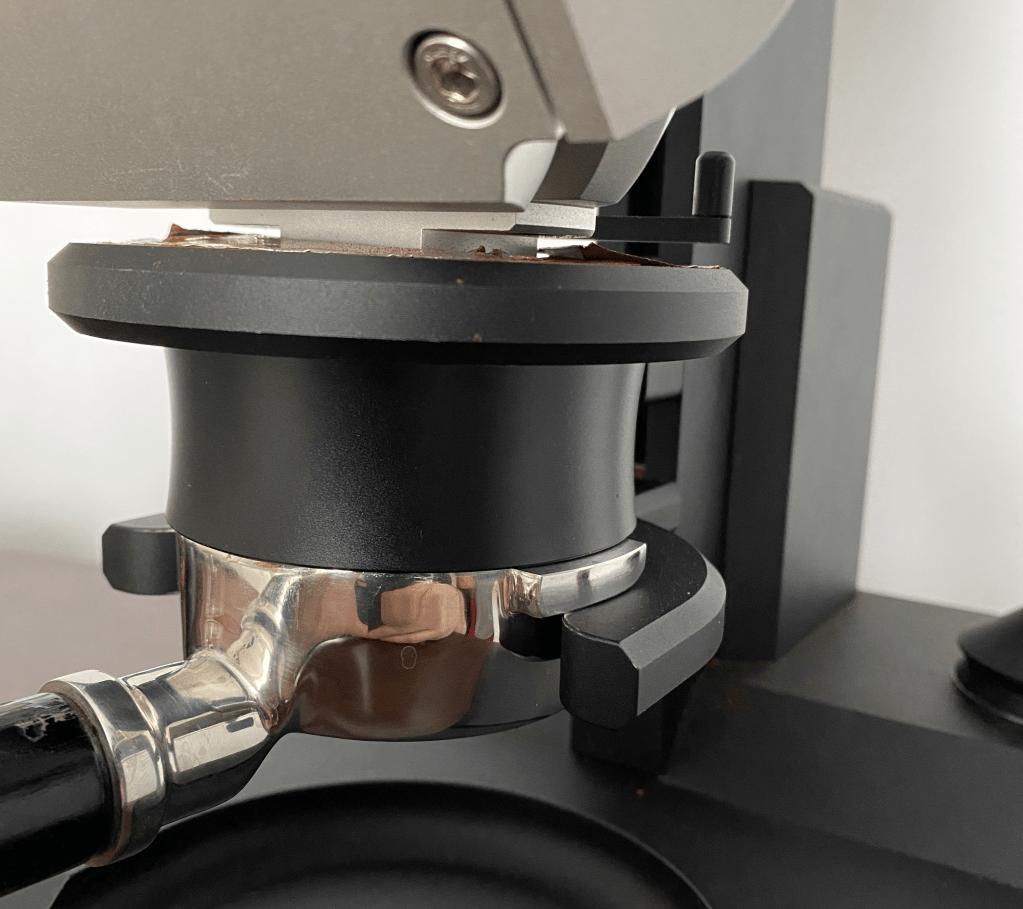
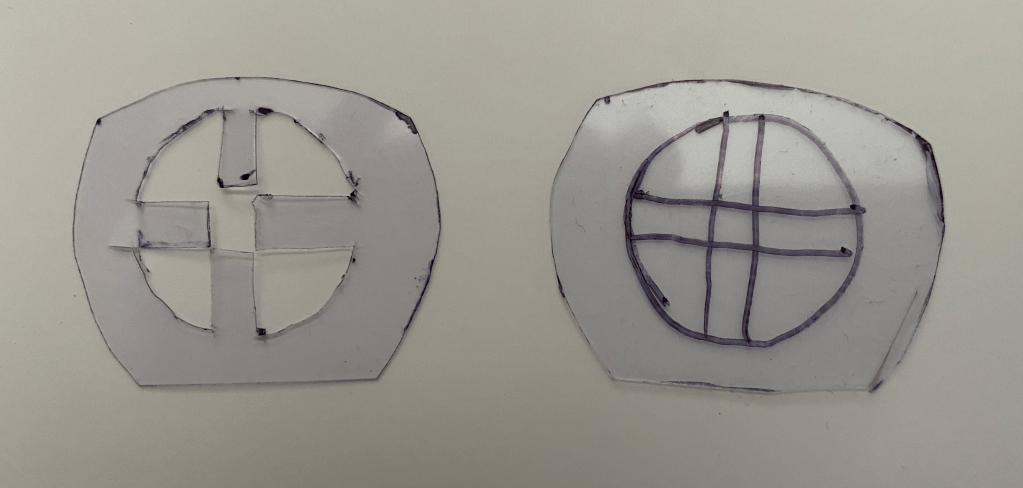
This is really convenient, because it will allow you to dislodge any coffee particles from the rail ring itself and it will really reduce retention. In addition to this, I recommend using Doug Weber’s wiper hack to help reduce retention inside of the exit chute. You can even go further and cut-out a second wiper that sticks out toward the bottom of the exit chute, to also prevent any coffee grounds from sticking to that surface too:
I recommend you make yourself one by placing a transparent piece of plastic against the bottom of the exit chute and tracing its shape with a marker. This is what this looks like for me:
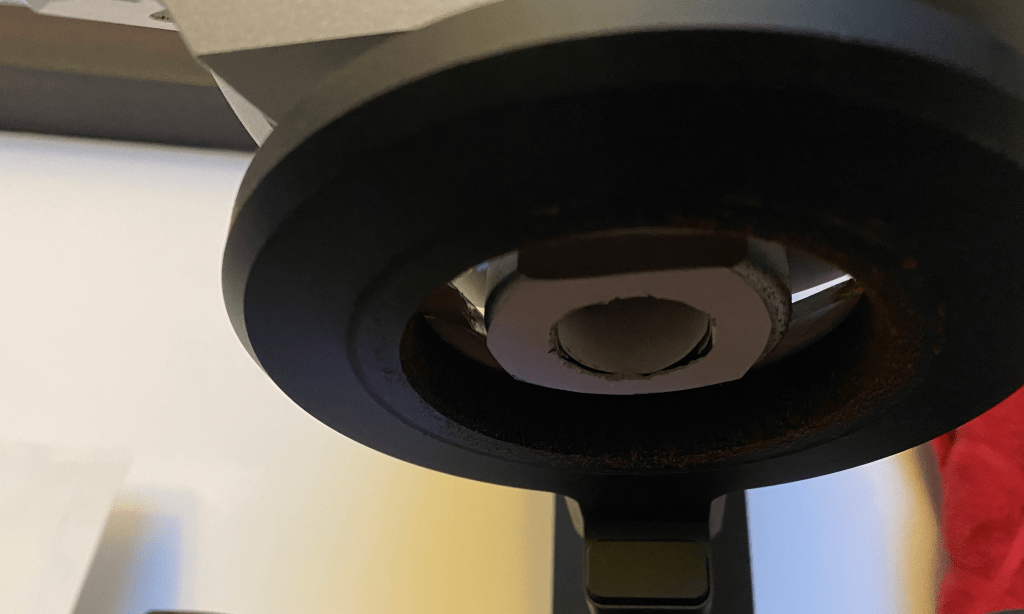
With the two wipers, my grinder chute looks extremely clean after grinding, despite the high rotation rate and very fine grind size.
In order to be able to grind fine enough for ULF shots, you have to be sure that your burrs are very well aligned. Fortunately, the EG-1’s design makes this easy, but you have to pay attention to parallel alignment if you have one of the earliest batches of the SSP ULF burrs, where the magnetic pin holes were not always placed precisely enough. In my case, this made it hard to place the lower burr completely flat against the bottom part of the burr carrier with just my hands. I also have the stock burrs, which do not have that problem at all; they are extremely easy to place in or take out with my fingers, without having to apply any force. Here’s how easy this should be in a video:
If you notice that you have to press a bit hard to get either of your SSP burrs in, you may have one from the earlier batches, and I recommend you use a wooden mallet to gently knock the burr left and right (on its teeth) until it lays perfectly flat against the bottom carrier. I like to hold the carrier against a bright background and try to see any light coming through the gap between the burr and its carrier. Repeat the gentle knocks until you can see no light passing there. I also recommend contacting Weber Workshops if you face this issue, because I have recently learned that they can send you narrower magnetic pins that completely fix this issue.
If you have the latest batches of SSP ULF burrs or the narrower magnetic pins, then all you need to care about is that your burrs and carrier are very clean before you place the burrs in, and then use Doug Weber’s method to place the burrs in:
When I use this method, I usually start near the zero dial on my grinder and the point where I can’t move the dial without causing the lower burr to co-rotate is usually very close to that zero mark. After having tightened the four screws on the burr carrier, the point where I can hear the burrs touching when I turn on the grinder is usually near the mark 8 below zero (i.e., 2 full dials below zero).
Now, you may be tempted to think that this grind size where the burrs touch is the finest grind setting of the EG-1. And it is not at all ! One design features of the EG-1 that took me a while to figure out is that the plate against which the upper burr sits is free to move up and down (but remains parallel to the bottom burr) during grinding. I am unsure of why this is, but I suspect it has something to do with improving either the alignment or the particle size distribution of the grinder. It could also just be there to allow you to go from a very coarse to a very fine grind size without having to grind the particles that remain between the burrs. Regardless, this means that even if your burrs touch, the upper burr will be lifted slightly when grinding, and the gap between your burrs will be larger than zero. In fact, I can go at least as fine as the 4.5 mark below zero, which corresponds to 5.5 dial numbers below zero, or in other words 3.5 numbers below the points where I first hear the burrs touching.
With that set-up I usually need a grind size in the range 4.8 to 5.2 when grinding 18 to 20 grams of coffee for a blooming shot with the paper filter sandwich method. Hence, I go between 2.8 and 3.2 finer than where I start hearing the burrs touch. With more classical shot profiles, I typically use grind sizes of 5.1 to 5.5 depending on the beans.
The rest of my workflow is already pretty well detailed in one of my previous posts, so I won’t repeat it here. I will, however, share a video of my routine with an ULF blooming shot, which you can view below:
You will notice that I turn the portafilter around a little while I’m grinding. I do this to try and get the coffee grounds to fall more evenly in the portafilter; note that you can’t turn the portafilter too much without it falling down from the forks. You will also notice that I let the grinder run for a bit longer for you to hear how the sound changes when there is no more coffee particles and oil between the burrs; this is when you can most clearly hear the outside edges of the burrs rubbing against each other. You will also see how I started with a vigorous surface WDT to break up the clumps that formed from coffee caking up against the chute (I would skip this step with a lower-rpm grinder), and then I I the usual, shorter, deep WDT where I start from deep down and up to the surface while stirring.
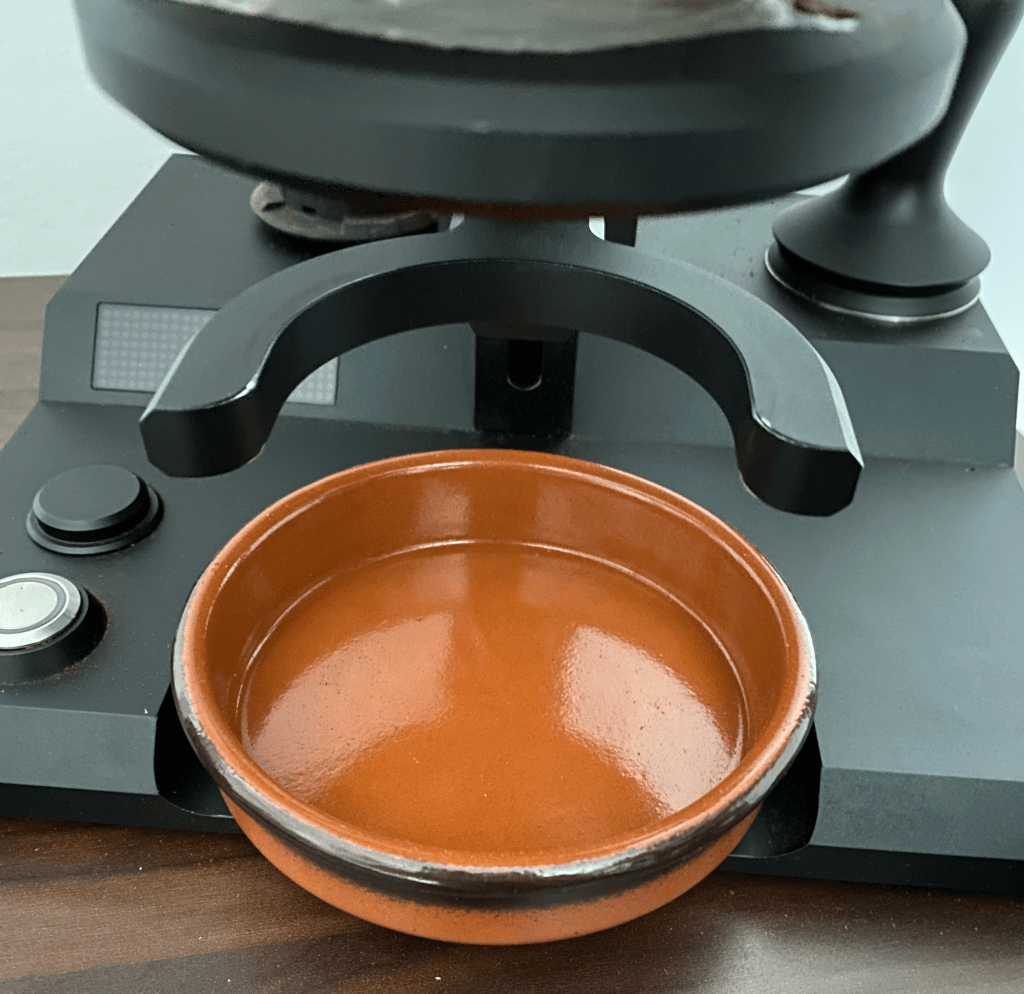
There are two additional tricks I’d like to share. First, I enjoy placing a shallow ramekin below the grinder chute, this way it will catch any stray grounds when you knock without a portafilter on, and it’s easier to throw them out.
Another trick that I really enjoy is to use a pipette brush to do a deep clean-up between the burrs. Basically, after unplugging the grinder, just open up the magnet-locked parts of the grind chamber, clean things up with a small brush, and then go 5 full rotations coarser on the dial (this means 50 full dial marks coarser). This is enough for me to fit the pipette brush between the burrs and clean up any kind of coffee particles or oil residue on the burrs. You would be amazed how much of a difference in taste this will make after just a week or two of regular use. This is still one of the top reasons why I wouldn’t swap grinders for anything else.

An off topic comment from the post at hand, but will there be a new update soon on the Tricolate brewer?
LikeLike
I am planning on this, yes. I’ve been dialing my filter brews again lately, but I expect it will take me a couple weeks to months before I’m comfortable enough to write about it.
LikeLike
Interesting, looking forward to it in the future!
I currently use a v60 but am looking to upgrade to possibly a stagg x or tricolate. Would you recommend one over the other currently?
I was considering the stagg x since you have a posted recipe for it; however, the tricolate seems like the possible future for percolation brewing, but I would most likely use the recipes on their website in the meantime if you eventually make a recipe for the tricolate.
LikeLike